Dinner · Part 2 of 3: Instructions
Cheesy Truffle Wild Mushroom Sourdough Pizza Step-by-step instructions
- Prep
- Cook
- Total
- Serves
- 2
Before you start
Before starting, ensure your pizza stone is in the oven and preheating. Take the sourdough dough out of the refrigerator and let it come to room temperature for about 30 minutes, which makes it easier to stretch.
Prepare all toppings: slice the mushrooms, mince the garlic, shred the cheeses, and measure the ricotta. Have the semolina flour ready for dusting.
Ingredients at a glance (11)
- 1 ball artisan fermented sourdough pizza dough (about 250 g)
- 1/4 cup semolina flour, for dusting
- 8 oz wild mushrooms (such as cremini, oyster, or shiitake), sliced
- 2 tbsp unsalted butter
- 2 cloves garlic, minced
- 1 tsp fresh thyme leaves
- 1/2 tsp sea salt
- 1 cup fontina cheese, shredded
- 1 cup fresh mozzarella, shredded
- 1/2 cup ricotta cheese
- 1 tbsp black truffle oil
Instructions
Sauté and stretch
- Prepare the mushroomsHeat a large skillet over high heat. Add the butter and let it foam. Add the sliced wild mushrooms in a single layer. Cook without moving them for 2 minutes, then toss. Add the minced garlic, fresh thyme, and sea salt. Continue cooking, stirring occasionally, until the mushrooms are deeply caramelized and fragrant, about 4 to 5 minutes. Transfer to a plate and set aside.Look for The mushrooms should be golden brown at the edges and release a nutty, savory aroma.Tip Don't overcrowd the pan; cook in batches if needed to ensure proper browning.
- Preheat the oven and stonePlace a pizza stone on the middle rack of the oven. Preheat the oven to 500°F (260°C) for at least 30 minutes before baking. If using a pizza steel, preheat for 45 minutes to ensure it is screaming hot.Look for The oven and stone should be fully preheated to achieve a blistered crust.Tip A hotter oven creates a better leopard-spotted crust; do not skip the preheating.
- Stretch the doughDust a clean work surface and the dough ball with semolina flour. Gently press the dough into a flat disk, then use your fingers to stretch it from the center outward, leaving the edges thicker to form a rim. Continue stretching until it reaches a 10 to 12-inch circle.Look for The dough should be thin in the center with a puffy rim, and it should not tear.Tip If the dough resists stretching, let it rest for 5 minutes before trying again.
The mushrooms should be deeply caramelized with a rich, nutty aroma, and the dough should be stretched into a thin round with a puffy rim. The semolina dusting prevents sticking, and the dough should feel elastic and smooth.
Top and bake
- Top the pizzaTransfer the stretched dough to a pizza peel dusted with semolina. Sprinkle the fontina and mozzarella evenly over the dough, leaving a 1-inch border. Scatter the sautéed mushrooms over the cheese. Drop small spoonfuls of ricotta over the top.Look for The toppings should be evenly distributed; the ricotta will soften during baking.Safe temperature 145°F (63°C) internal temperature (shellfish)Tip Avoid overloading the pizza; too many toppings can make the center soggy.
- Bake the pizzaSlide the pizza onto the preheated pizza stone. Bake for 7 to 8 minutes, until the crust is blistered and leopard-spotted, the cheese is bubbling and golden in spots, and the rim is puffed and charred in places.Look for The crust should be deeply browned with charred spots, and the cheese should be molten.Tip Rotate the pizza halfway through if your oven heats unevenly.
The pizza should be evenly topped, with the cheeses covering the surface and the mushrooms scattered.
During baking, the crust will puff and blister, and the cheese will melt and bubble. The pizza is ready when the crust is charred and the cheese is golden.
Finish and serve
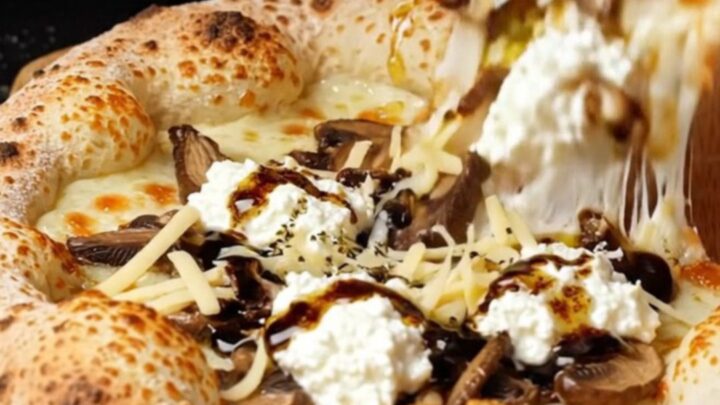
- Finish and serveRemove the pizza from the oven and place it on a cutting board. Drizzle the black truffle oil evenly over the hot pizza. Let it cool for 2 minutes, then slice with a rocker knife or pizza cutter. Pull a slice to reveal the cheese stretch and serve immediately.Look for The cheese should stretch when pulled, and the crust should crackle as you slice.Tip Slice with a rocking motion for a clean cut without dragging the toppings.
After drizzling with truffle oil, the pizza should be sliced with a clean cut, revealing a stretchy cheese pull. The crust should crackle audibly when cut, and the aroma of truffle and melted cheese should be intense.
Common mistakes
A common mistake is not preheating the pizza stone long enough, resulting in a pale, doughy crust. Another is overloading the pizza with too many toppings, which can make the center soggy.
Also, be careful when stretching the dough—use your fingertips to gently press and stretch, avoiding tears. If the dough springs back, let it rest for a few minutes before continuing.
How to tell it’s done
The pizza is done when the crust is deeply blistered with charred leopard spots, and the cheese is fully melted and bubbling with golden brown patches.
The rim should be puffed and crisp to the touch. If you have an instant-read thermometer, the center of the crust should read above 200°F (93°C). The cheese should be molten and stretchy when pulled.
- Shellfish: 145°F (63°C) in the thickest part
Up next · Part 3 of 3
4 variations · storage & make-ahead · 5 answers · printable card
Tips, FAQ & printable recipe (Part 3)← Back to the ingredients (Part 1)