Dinner · Part 2 of 3: Instructions
Cheesy Roasted Tomato Tagliatelle with Mozzarella Pull Step-by-step instructions
- Prep
- Cook
- Total
- Serves
- 4
Before you start
Before you start, set out all your ingredients. Shred the mozzarella if you bought it in a block—pre-shredded cheese often has anti-caking agents that prevent smooth melting. Bring a large pot of salted water to a boil for the pasta.
Have a colander ready for draining. The vegetables can roast while the water heats, so you can multitask. Keep the pasta water nearby; you'll need it to loosen the sauce. Set your skillet over medium-high heat so it's nice and hot before adding the oil.
Ingredients at a glance (10)
- 12 oz dried tagliatelle
- 4 large ripe tomatoes, whole
- 2 green bell peppers, whole
- 4 cloves garlic, peeled
- 3 tbsp extra-virgin olive oil
- 1 tsp dried oregano
- 8 oz fresh mozzarella, shredded
- 1/4 cup fresh basil leaves
- Kosher salt, to taste
- Freshly ground black pepper, to taste
Instructions
Char and Smash
- Roast the vegetablesPlace a large skillet over medium-high heat and add the olive oil. Add the whole tomatoes, green bell peppers, and garlic cloves. Sprinkle with dried oregano, salt, and black pepper. Cook, turning occasionally, until the tomatoes are charred and soft and the peppers are blistered, about 8 to 10 minutes. Use tongs to turn them gently so they roast evenly.Look for Tomatoes are charred in spots and release their juices; peppers are blistered and tender.Tip Don't crowd the pan—give the vegetables room to char, not steam.
- Soften and smashOnce the vegetables are soft, use a fork or potato masher to smash them right in the skillet. Break up the tomatoes and peppers into a chunky sauce. Continue cooking for 2 to 3 minutes, stirring, until the sauce thickens slightly. Taste and adjust salt and pepper.Look for The sauce is chunky, glossy, and smells sweet and charred.Tip Smash to your preferred texture—chunky or smoother, both work.
At the end of this phase, the skillet should smell deeply roasted and sweet. The tomatoes are charred in spots, with their skins wrinkled and juices bubbling. The peppers are blistered and tender, and the garlic is soft and golden. When you smash the vegetables, they should break apart easily into a chunky sauce. The sauce should be thick and glossy, with a deep red color and charred bits throughout. Taste it—it should be sweet, slightly smoky, and well seasoned.
Toss and Melt
- Cook the tagliatelleBring a large pot of salted water to a boil. Add the tagliatelle and cook according to package instructions until al dente. Reserve about 1 cup of pasta water before draining. Drain the pasta in a colander.Look for Pasta is tender but still has a slight bite in the center.Tip Reserve more pasta water than you think you need—it's the secret to a silky sauce.
- Toss pasta with sauceAdd the drained tagliatelle directly to the skillet with the roasted tomato-pepper sauce. Toss with tongs to coat every ribbon evenly. If the sauce seems thick, add a splash of the reserved pasta water to loosen it.Look for The pasta is evenly coated in the red sauce, with no dry spots.Tip Toss over medium heat to help the sauce cling to the pasta.
- Fold in the mozzarellaReduce the heat to low. Add the shredded mozzarella to the skillet in handfuls, folding it into the pasta with tongs. Keep folding until the cheese melts into long, stretchy strands that coat the noodles. If needed, add a little more pasta water to create a creamy sauce.Look for The cheese is fully melted and pulls into long, elastic strings when lifted.Tip Fold gently—overmixing can make the cheese clump.
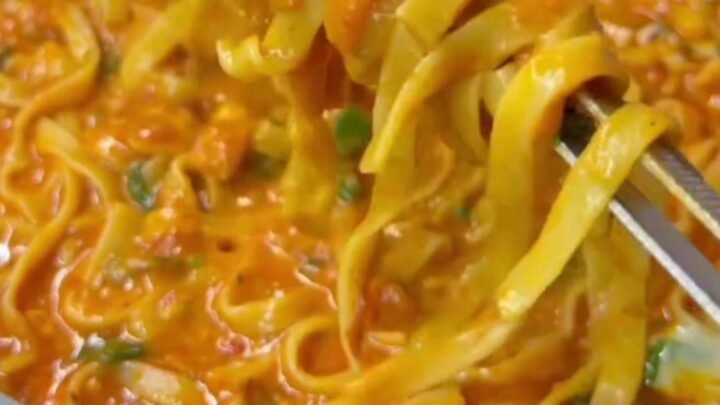
The pasta is now coated in the sauce, and the mozzarella is just starting to melt. The cheese should be soft and stretchy, not fully melted but clearly on its way. The sauce should be clinging to the noodles, with a creamy, glossy appearance.
If you lift a strand, the cheese should pull into a short, elastic string. The pan should be fragrant with roasted tomatoes and garlic, and the cheese should smell milky and rich. Don't let the cheese sit too long—it will continue to melt off the heat.
Basil and Serve
- Finish with basil and serveRemove the skillet from the heat. Tear the fresh basil leaves and scatter them over the pasta. Twirl a generous forkful to check the cheese pull, then serve immediately while the cheese is still hot and stretchy.Look for The cheese pulls in long ribbons and the basil smells fresh and bright.Tip Serve straight from the skillet for maximum drama and heat.
The dish is finished: the cheese pulls in long, dramatic strands, and the basil adds a fresh, bright note. The pasta is glossy and coated, with no dry spots. The sauce is thick enough to cling but loose enough to coat each strand. The cheese is fully melted and stretchy, not greasy or clumpy. The whole skillet looks irresistible—chunky red sauce, green flecks of basil, and golden ribbons of melted mozzarella. Serve immediately, because the cheese pull is best when the pasta is piping hot.
Common mistakes
One common mistake is overworking the cheese. If you stir too vigorously, the mozzarella can seize into a rubbery clump. Fold gently and patiently. Another mistake is not reserving enough pasta water; the sauce can become sticky and dry. Always keep a cup aside.
Skipping the char on the vegetables is another misstep—without it, the sauce lacks depth. Don't rush the roasting; let the vegetables blister and soften fully. Finally, adding the cheese over high heat can cause it to separate and become greasy. Always reduce the heat to low before folding in the mozzarella.
How to tell it’s done
The pasta is done when the cheese is fully melted and pulls into long, stretchy strands when you lift a forkful. The sauce should coat each ribbon evenly, with no dry spots. The tomatoes should be completely soft and easily smashed, and the peppers tender with charred edges.
If you want to be precise, the internal temperature of the dish should reach at least 165°F (74°C) if you're checking for food safety, but since there's no raw protein, the visual cues are more important. The basil should be wilted slightly but still bright green.
Up next · Part 3 of 3
4 variations · storage & make-ahead · 5 answers · printable card
Tips, FAQ & printable recipe (Part 3)← Back to the ingredients (Part 1)