Appetizers · Part 1 of 3: Ingredients
Cheesy Polenta Fries with Marinara and Melted Provolone
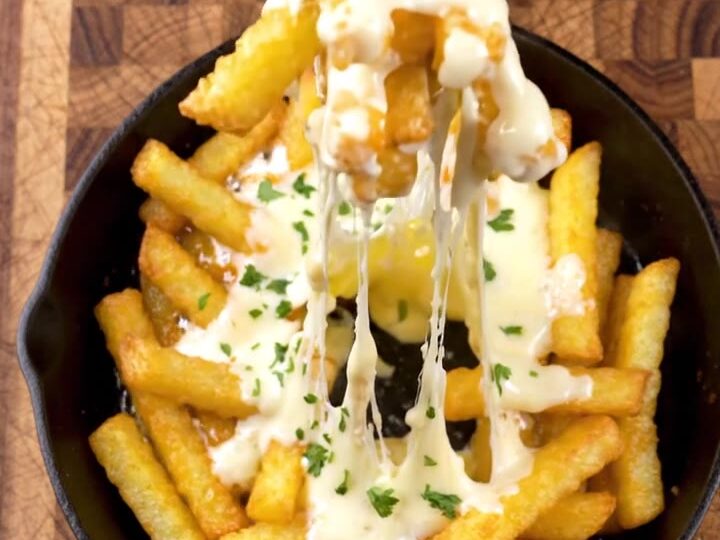
- Prep
- Cook
- Total
- Serves
- 4
Crispy on the outside, soft and creamy within, polenta fries are a hearty appetizer that takes almost no effort. Here they go straight into a cast iron skillet with bright marinara and melted provolone, so everything comes to the table hot and ready to share.
This dish turns a humble block of polenta into a crowd-pleasing snack. You start with a firm, chilled block, slice it into long sticks, and season them lightly with salt before they meet hot oil. Once golden, the fries share the skillet with spooned marinara and sheets of provolone that melt into a glossy, stretchy layer.
A final toss with tongs pulls cheese and sauce through every piece, and a scatter of chopped parsley and grated provolone finishes the plate.
It is a dish built around texture: the crunch of the fried edges, the tender centre, and the pull of the melted cheese. The whole process happens in one pan, which keeps cleanup simple and makes it easy to serve straight from the skillet at the table.
Ingredients
- 1 tube (16 oz) firm polenta, chilled
- kosher salt, to taste
- 1 1/2 cups neutral frying oil, such as vegetable or canola oil
- 1 cup marinara sauce, warmed
- 4 oz provolone cheese, half grated and half sliced thin
- fresh parsley, chopped, for garnish, to taste
- red chili peppers, sliced, optional
- whole garlic cloves, optional, for the oil
Why this recipe works
Polenta is cooked and then set until firm, so it already has the structure to hold a fry shape. Chilling the block keeps the sticks from softening when they are cut, and the starch in the cornmeal browns beautifully in hot oil. The outside turns crisp and golden while the inside stays tender and creamy, which is exactly the contrast that makes fried polenta so satisfying.
Frying first and adding the sauce and cheese afterwards is the key to the method. The fries keep their crunch because they are not soaked in liquid, while the marinara warms through and the provolone melts over the top. Tossing at the end distributes the molten cheese without breaking the sticks, so each bite carries crisp texture, tangy tomato and stretchy cheese together.
Notes and substitutions
Choose a firm, pre-made polenta tube or a block you have set yourself in a loaf pan and chilled for at least four hours. A soft polenta will break apart in the oil, so firmness matters more than the brand or the cornmeal grind.
Provolone melts with a smooth, stretchy texture and a mild sharpness that suits marinara, but low-moisture mozzarella works if you prefer a milder flavour.
A 12-inch cast iron skillet holds enough oil and fries for the whole recipe, and its heat retention keeps the oil temperature steady. A sharp chef's knife and a stable wooden board make clean, even cuts.
A box grater gives you a fine shred of provolone for the garnish. Tongs make turning and tossing easy, and paper towels drain the fries after frying. Use a neutral oil with a high smoke point so the fries brown without tasting bitter.
- firm polenta tube: homemade polenta chilled and set in a loaf pan, at least 4 hours
- provolone: low-moisture mozzarella for a milder, milkier melt
- marinara sauce: a simple tomato sauce seasoned with garlic, salt and olive oil
Equipment
- 12-inch cast iron skillet
- chef's knife
- wooden cutting board
- box grater
- tongs
- paper towels
Up next · Part 2 of 3
6 steps · 15 min of cooking · what to look for at each stage
Step-by-step instructions (Part 2)