Dinner · Part 2 of 3: Instructions
Cheesy Pizza Hamburger Helper for a Quick Weeknight Dinner Step-by-step instructions
- Prep
- Cook
- Total
- Serves
- 4
Before you start
Before beginning, ensure all ingredients are measured and ready. Chop the fresh parsley and have the mozzarella and pepperoni measured out.
If using a large block of mozzarella, shred it yourself for better melting properties compared to pre-shredded varieties, which often contain anti-caking agents.
Having everything prepped ensures the cooking process flows smoothly, as this dish comes together quickly once the heat is turned on.
Ingredients at a glance (6)
- 1 lb ground beef
- 8 oz penne pasta
- 2 cups marinara sauce
- 1 cup shredded mozzarella cheese
- 1/2 cup pepperoni slices
- fresh parsley, chopped, for serving
Instructions
Browning the base
- Brown the beefHeat a large cast-iron skillet over medium-high heat. Add the ground beef and cook, breaking it apart with a wooden spoon, until it is fully browned and no pink remains. Ensure the internal temperature reaches at least 160°F (71°C) to ensure it is cooked through.Look for The beef should be browned and crumbly.Safe temperature 160°F (71°C) internal temperature (ground meat)Tip Drain any excess fat from the skillet if desired.
The ground beef should be fully browned and fragrant. Ensure all moisture from the meat has evaporated and the beef has developed a nice crust, which adds depth to the overall flavor of the sauce. Check that no pink remains before proceeding to the next step.
Simmering the pasta
- Simmer the pastaAdd the marinara sauce and penne pasta to the skillet with the browned beef. Stir well to combine. Cover the skillet or maintain a simmer, stirring occasionally, until the pasta is tender and the sauce has thickened to a rich consistency.Look for The pasta should be al dente.Tip Add a splash of water if the sauce becomes too thick.
The pasta should be cooked to an al dente texture, meaning it is tender but still has a slight bite. The sauce should be thick and clinging to the pasta and beef. If the sauce looks too thin, continue simmering for a few more minutes until it reduces.
Final melting
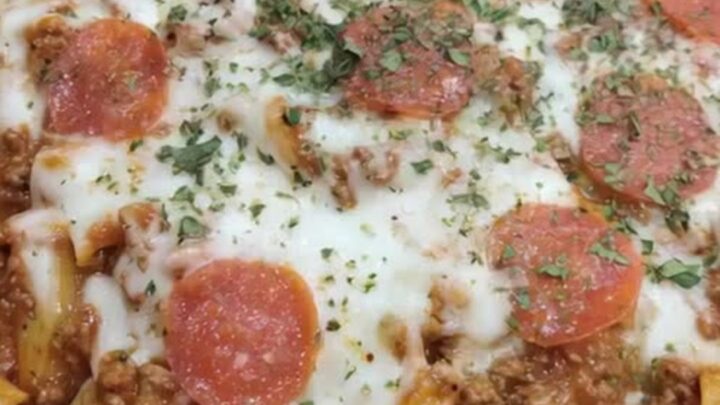
- Melt and garnishTop the pasta mixture evenly with the shredded mozzarella cheese and pepperoni slices. Allow the cheese to melt fully under a lid or in the residual heat until it becomes stretchy. Sprinkle with fresh chopped parsley before serving.Look for The cheese should be bubbly and melted.Tip Watch the cheese closely to prevent burning.
The mozzarella should be fully melted and stretchy, with the pepperoni slices warmed through and slightly crisp at the edges. The dish should smell savory and inviting, with the parsley providing a fresh aromatic finish before serving.
Common mistakes
A common mistake is overcrowding the skillet, which can lead to uneven cooking and mushy pasta. Ensure the skillet is large enough to handle all components.
Another error is failing to stir the mixture during the simmering phase; stirring prevents the pasta from sticking to the bottom of the pan and helps distribute the heat and sauce evenly throughout the meal.
How to tell it’s done
The dish is done when the pasta is tender to the bite and the mozzarella is completely melted and bubbly. The internal temperature of the ground beef must reach at least 160°F (71°C) to ensure safety.
Check the center of the skillet to ensure the pasta is cooked through and the sauce has reached the desired consistency, coating the ingredients evenly.
- Ground meat: 160°F (71°C) in the thickest part
Up next · Part 3 of 3
2 variations · storage & make-ahead · 3 answers · printable card
Tips, FAQ & printable recipe (Part 3)← Back to the ingredients (Part 1)