Dinner · Part 2 of 3: Instructions
Cheesy Philly Cheesesteak Sliders Step-by-step instructions
- Prep
- Cook
- Total
- Serves
- 12
Before you start
Before starting, ensure all ingredients are ready for immediate use. Thinly slice the beef into bite-sized strips and chop the red peppers into thin slices. Pre-slice your slider buns horizontally to keep the assembly process efficient.
Have your baking sheet lined and your garlic butter mixture whisked and ready. Organizing the workspace ahead of time is the key to a stress-free cooking experience when dealing with hot skillets and quick assembly steps.
Ingredients at a glance (6)
- 1 lb beef
- 2 cups red peppers
- 12 slices provolone cheese
- 1 pack slider buns
- 1/4 cup melted garlic butter
- 1 tbsp herbs
Instructions
Sautéing the filling
- Cook the fillingHeat a large skillet over medium-high heat. Add the beef and cook until browned. Add the red peppers and sauté until tender. Ensure the internal temperature of the beef reaches at least 145°F (63°C). Let the meat rest for 5 minutes before assembling.Look for The beef should be browned and peppers softened.Safe temperature 145°F (63°C) internal temperature (steaks, chops and roasts)Tip Do not overcrowd the skillet to ensure proper browning.
At the end of this phase, the kitchen should be filled with the savory aroma of browned beef and caramelized peppers. The beef should be tender and the peppers softened but still holding their shape. Before moving on, check that the beef has reached the required internal temperature and that excess liquid has evaporated from the pan to prevent soggy sliders.
Assembling the layers
- Assemble the slidersSlice the pack of slider buns in half horizontally. Place the bottom halves on a baking sheet. Layer the cooked beef and pepper mixture evenly over the buns, then top with the provolone cheese slices. Place the top bun halves over the cheese.Look for The cheese should cover the meat layer completely.Tip Use a serrated knife to slice the entire block of buns at once.
The assembly should look neat, with the beef and pepper mixture evenly distributed across the bottom bun layer. Ensure the cheese slices cover the filling completely, as this creates the necessary seal to keep the sliders moist. Before proceeding, verify that the top buns are positioned correctly and the entire assembly is stable for the final bake.
Baking to perfection
- Bake until goldenIn a small bowl, combine the melted garlic butter and herbs. Brush this mixture generously over the tops of the slider buns. Bake in a preheated oven at 350°F (175°C) until the cheese is melted and the tops are golden brown.Look for The rolls should be golden brown and the cheese bubbling.Tip Watch the oven closely to prevent the garlic butter from burning.
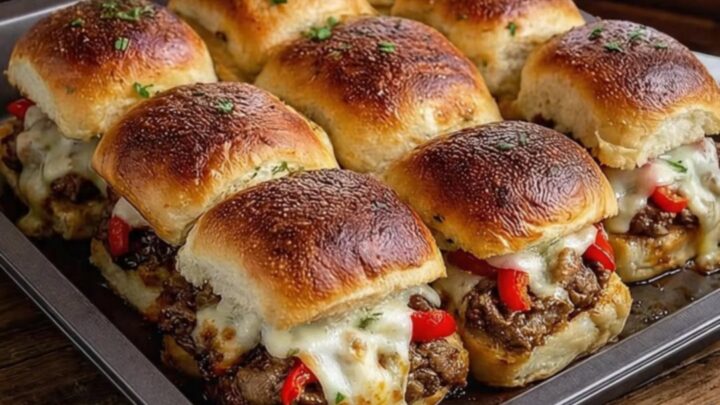
The final sliders should look inviting, with a glossy, golden-brown top from the herb-flecked garlic butter. The cheese should be visibly melted and slightly oozing from the sides.
The texture should be a balance of crispy bread tops and soft, cheesy interiors. Let the sliders rest briefly before slicing, as this allows the cheese to set slightly for easier serving.
Common mistakes
A common mistake is overcrowding the skillet, which causes the beef to steam rather than sear, resulting in a grey color and chewy texture. Always cook the meat in batches if necessary.
Another error is using buns that are too dry; ensure you use fresh, soft slider rolls to get the best texture. Finally, avoid over-baking the sliders, as this can make the bottom buns soggy or cause the garlic butter to burn, negatively impacting the flavor profile.
How to tell it’s done
The sliders are done when the cheese is fully melted and bubbling between the layers and the tops of the buns are a deep, golden brown. The internal temperature of the beef filling must reach at least 145°F (63°C) to ensure safety and tenderness.
If the tops of the buns brown too quickly before the cheese has melted, cover the pan lightly with aluminum foil for the final few minutes of the baking process.
- Steaks, chops and roasts: 145°F (63°C) in the thickest part, then a 3-minute rest
Up next · Part 3 of 3
2 variations · storage & make-ahead · 3 answers · printable card
Tips, FAQ & printable recipe (Part 3)← Back to the ingredients (Part 1)