Appetizers · Part 2 of 3: Instructions
Cheesy Garlic Butter Pull-Apart Brioche Wreath Step-by-step instructions
- Prep
- Cook
- Total
- Serves
- 8
Before you start
Before starting, ensure the brioche dough is at room temperature for easier handling. If the dough is cold, let it sit for 30 minutes. Prepare the garlic herb butter and beat the egg for the wash.
Line a round baking tray with parchment paper and place a small oven-safe ramekin in the center. Have all ingredients measured and ready.
Ingredients at a glance (6)
- 500 g prepared brioche dough
- 16 bocconcini mozzarella balls
- 1 egg, beaten
- 1/2 cup garlic herb butter, melted
- 1/4 cup grated parmesan cheese
- 1 cup warm marinara sauce, for serving
Instructions
Shaping the Dough
- Prepare the Dough BallsDivide the brioche dough into 16 equal portions. Flatten each portion into a disk about 3 inches across. Place one bocconcini ball in the center of each disk. Pull the edges up and pinch firmly to seal, forming a smooth, round ball. Repeat with the remaining dough and cheese.Look for The dough balls should be smooth and sealed with no cheese visible.Tip Keep the dough covered with plastic wrap while working to prevent drying.
- Shape the WreathLine a round baking tray with parchment paper. Place a small oven-safe ramekin in the center. Arrange the stuffed dough balls in two concentric circles around the ramekin, leaving a small gap between each ball. The balls should touch slightly but not be crowded.Look for A neat wreath shape with a clear center for the ramekin.Tip Use a 6-inch ramekin to create the center hole.
The dough balls should be smooth, round, and completely sealed, with no cheese visible. When arranged around the ramekin, they should form a neat circle with even spacing. The dough should feel soft and slightly springy to the touch.
Baking to Golden Perfection
- Brush and BakePreheat the oven to 375°F (190°C). Brush the wreath with the beaten egg wash. Brush half of the garlic herb butter over the top. Bake for 22 minutes, until the bread is deep golden brown and puffed. The internal temperature of the egg wash should reach 160°F (71°C) to ensure the egg is fully cooked.Look for The wreath is mahogany gold and puffed.Safe temperature 160°F (71°C) internal temperature (egg dishes)Tip If the top browns too quickly, tent loosely with foil.
The wreath should be deep golden brown, puffed, and aromatic with garlic and butter. The egg wash gives a shiny, glossy finish. The kitchen will smell of warm bread and herbs. The wreath should feel firm to the touch but slightly springy.
Final Glaze and Serving
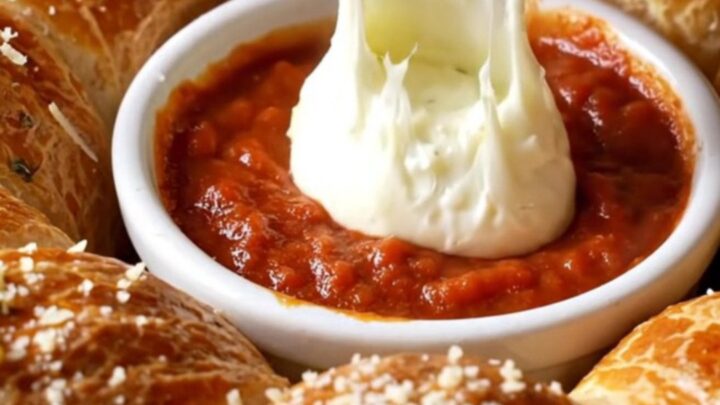
- Finish and ServeRemove the wreath from the oven and immediately brush with the remaining garlic herb butter. Sprinkle with the grated parmesan. Fill the center ramekin with warm marinara sauce. Pull a roll from the wreath, dip it into the sauce, and enjoy while warm.Look for The cheese stretches as you pull the rolls apart.Tip Serve immediately for the best cheese pull.
After brushing with the remaining garlic herb butter and sprinkling with parmesan, the wreath glistens and the cheese is visible at the edges.
When you pull a roll, the mozzarella stretches beautifully. The center ramekin is filled with warm marinara, ready for dipping.
Common mistakes
Avoid overfilling the dough with cheese, as it can leak out during baking. Ensure the dough balls are sealed tightly to prevent the cheese from escaping.
Do not overcrowd the wreath; leave a small gap between balls so they can expand and bake evenly. If the top browns too quickly, tent with foil to prevent burning.
How to tell it’s done
The wreath is done when it is deep golden brown and puffed, about 22 minutes. The internal temperature of the egg wash should reach 160°F (71°C) to ensure the egg is fully cooked.
The bread should sound hollow when tapped on the bottom. Let it cool for 5 minutes before brushing with the remaining butter and serving.
- Egg dishes: 160°F (71°C) in the thickest part
Up next · Part 3 of 3
4 variations · storage & make-ahead · 5 answers · printable card
Tips, FAQ & printable recipe (Part 3)← Back to the ingredients (Part 1)