Dinner · Part 2 of 3: Instructions
Cheesy Garbage Bread for Quick Comfort Step-by-step instructions
- Prep
- Cook
- Total
- Serves
- 6
Before you start
Before beginning, ensure all ingredients are measured and ready. If using a raw pizza dough, take it out of the refrigerator 30 minutes in advance so it is easier to roll.
Preheat the oven to 400°F (200°C) well before the baking step to ensure consistent heat distribution. Have a clean, floured surface ready for rolling the dough and a parchment-lined baking sheet nearby for easy cleanup.
Ingredients at a glance (5)
- 1 lb store-bought or made ahead pizza dough
- 1 lb ground beef
- 2 cups shredded mozzarella cheese
- 3 tbsp butter, melted
- 1 tsp garlic powder
Instructions
Browning the beef
- Prepare the fillingHeat a large skillet over medium-high heat. Add the ground beef and cook, breaking it apart with a wooden spoon, until browned and no longer pink. Ensure the internal temperature reaches 160°F (71°C). Drain any excess grease from the skillet and set the beef aside to cool slightly before assembling.Look for The beef should be fully browned and crumbly with no pink remaining.Safe temperature 160°F (71°C) internal temperature (ground meat)Tip Season the beef with salt and pepper to taste while cooking to enhance the savory notes.
The ground beef should be fully browned with no visible pink. The texture should be small and crumbly, which ensures it distributes evenly within the bread. The aroma should be savory and well-seasoned. Drain any excess fat thoroughly to ensure the final bread does not become soggy.
Braiding the loaf
- Assemble the loafRoll out the pizza dough on a flat surface into a large rectangle. Spoon the cooked ground beef down the center and top generously with the shredded mozzarella cheese. Cut strips along the sides of the dough and braid them over the filling, sealing the edges tightly to keep the cheese inside.Look for The braid should look uniform and the filling should be completely enclosed.Tip Tuck the ends of the dough under the loaf to prevent any leakage during the baking process.
The braid should look tight and uniform. The dough strips should overlap securely, completely concealing the beef and cheese.
Ensure there are no large gaps where the filling might escape. The loaf should look like a neat, braided package ready for the oven, with the edges tucked neatly underneath.
Baking until golden
- Bake and finishPreheat the oven to 400°F (200°C). Whisk together the melted butter and garlic powder in a small bowl. Brush the mixture over the braided dough. Place the loaf on a baking sheet and bake for 20 to 25 minutes, or until the crust is golden brown and the cheese is bubbling. Let it rest for 5 minutes before slicing.Look for The crust should be deep golden brown and the cheese should appear melted and bubbly.Tip Watch the oven closely during the last few minutes to ensure the crust does not burn.
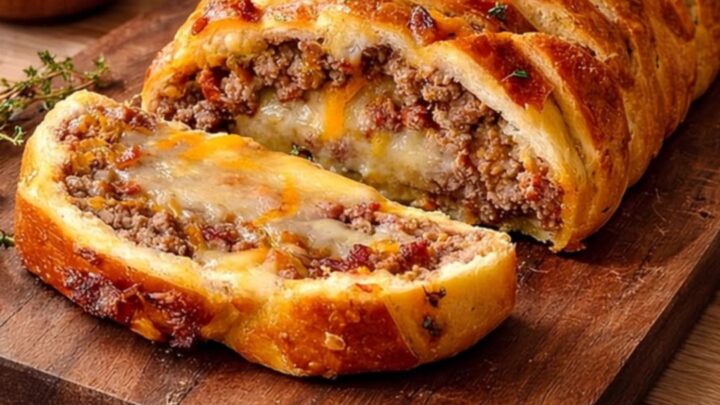
The exterior should be a rich, golden brown color. The garlic butter should have created a shiny, fragrant crust. The cheese should be bubbling through the gaps in the braid. The bread should feel firm to the touch, indicating that the dough is fully cooked through and crispy.
Common mistakes
Avoid overstuffing the dough, as this makes it difficult to braid and increases the risk of the loaf bursting in the oven.
Do not skip the resting time after baking; giving the loaf five minutes to sit allows the cheese and beef juices to stabilize, making it much easier to slice without the filling spilling out onto the cutting board.
How to tell it’s done
The garbage bread is done when the dough is deep golden brown and sounds hollow when tapped gently. The internal filling should be piping hot, and the cheese should be visibly melted and bubbling through the braided layers.
Ensure the ground beef reaches a safe internal temperature of 160°F (71°C) during the initial browning phase before it is baked inside the dough.
- Ground meat: 160°F (71°C) in the thickest part
Up next · Part 3 of 3
2 variations · storage & make-ahead · 3 answers · printable card
Tips, FAQ & printable recipe (Part 3)← Back to the ingredients (Part 1)