Dinner · Part 2 of 3: Instructions
Cheesy Chicken Enchiladas with Creamy Salsa Sauce Step-by-step instructions
- Prep
- Cook
- Total
- Serves
- 6
Before you start
Heat the oven to 375°F (190°C) and set the rack in the center. Gather the equipment: a large skillet for the chicken, a medium saucepan for the sauce, a mixing bowl for the filling, two forks, a whisk and a 9x13-inch glass baking dish. Pat the chicken dry and measure the spices into a small bowl so seasoning takes seconds.
Grate or check the shredded cheese, open the salsa, and have the sour cream out of the refrigerator by the time the sauce comes together. Warm the tortillas last, just before rolling, so they stay soft and pliable. With everything staged, the assembly moves in one smooth pass.
Ingredients at a glance (13)
- 1 1/2 lb boneless skinless chicken breasts
- 1 tbsp olive oil
- 1 tbsp chili powder
- 2 tsp ground cumin
- 1 tsp garlic powder
- 1 tsp kosher salt
- 2 tbsp butter
- 2 tbsp all-purpose flour
- 1 1/2 cups chicken broth
- 1 cup sour cream
- 1 cup salsa
- 10 8-inch flour tortillas, warmed
- 3 cups shredded Mexican cheese blend, divided
Instructions
Phase 1: Cook and shred the chicken
- Season and sear the chickenPat the chicken breasts dry with paper towels and rub them all over with the olive oil, chili powder, ground cumin, garlic powder and kosher salt. Heat a large skillet over medium heat and sear the chicken 5 to 6 minutes per side, turning once, until deeply golden and cooked through to 165°F (74°C) at the thickest point.Look for The spice coating turns deep golden and the edges of the chicken look firm and opaque all the way through.Safe temperature 165°F (74°C) internal temperature (poultry)Tip An instant-read thermometer takes out the guesswork; slide it into the thickest breast for a true reading.
- Rest and shred the chickenTransfer the chicken to a plate and let it rest 5 minutes so the juices settle. Shred it with two forks, pulling the fibers apart into bite-size strands, and place it in a mixing bowl. Add 1/2 cup of the shredded cheese and toss so the warm chicken melts it slightly and binds the filling.Look for The strands look moist and glistening, and the cheese has just started to soften into the meat.Tip Shred while warm, not hot; the fibers pull apart cleanly and the filling holds together better when rolled.
By the end of this phase the chicken is golden outside, cooked through to 165°F (74°C), and shredded into moist, glistening strands tossed with a little melted cheese. The kitchen smells of toasted chili powder and cumin, and the filling holds together in a loose clump when pressed with a fork rather than falling apart into dry bits.
Check that no piece of chicken looks pink anywhere, especially near the thickest point, before moving on. If the meat seems dry at all, a spoonful of the sauce stirred into the bowl at this stage brings it right back.
Phase 2: Sauce, fill and roll
- Build the cream sauceIn a medium saucepan over medium heat, melt the butter and whisk in the all-purpose flour. Cook 1 minute, then whisk in the chicken broth a little at a time until smooth. Simmer 2 to 3 minutes until it coats the back of a spoon, then take the pan off the heat and stir in the sour cream and the salsa until glossy.Look for The sauce coats a spoon evenly and no flour taste remains; it should look silky, not thick like paste.Tip Stirring the sour cream in off the heat keeps it from curdling and gives the sauce its shine.
- Warm the tortillasWrap the tortillas in a damp paper towel and microwave them 30 to 45 seconds, or warm them one by one in a dry skillet. Soft tortillas roll without cracking and hold their shape in the dish. Keep them stacked and covered so they stay pliable while the filling and sauce are ready.Look for A tortilla folds over your finger without cracking or springing back at the crease.Tip Warm them right before rolling; tortillas that cool down stiffen fast and tear at the seam.
- Fill and roll the enchiladasSpoon about 1/3 cup of the chicken filling down the center of each tortilla, then roll it up snugly and set it seam-side down in the baking dish. Pack them side by side so they hold each other in place. Work through all ten, keeping the rolls tight but not bursting.Look for Each roll sits snug against its neighbors with the seam tucked underneath, and nothing unwinds.Tip A snug row of enchiladas bakes evenly and is much easier to lift out with a spatula later.
- Sauce and top with cheeseSpread the cream sauce evenly over the rolled enchiladas, letting it drip into the gaps between them, then scatter the remaining 2 cups of shredded cheese over the top in an even layer. Make sure every tortilla edge is covered with sauce so no corner dries out in the oven.Look for No dry tortilla peeks through; the cheese covers the sauce in a uniform blanket.Tip Reserve a small handful of cheese to add halfway through baking if the top looks thin in spots.
The sauce should look silky and pourable, coating the back of a spoon without pasting it, and it should taste seasoned from the salsa with no raw flour note. Every tortilla is rolled snugly and packed seam-side down, the sauce covers every inch of them, and the cheese sits in an even layer on top with no tortilla showing through. The dish should look wet and generous, glossy with sauce at the edges. If any corner looks dry, spoon a little extra sauce over it before the dish goes into the oven.
Phase 3: Bake, rest and serve
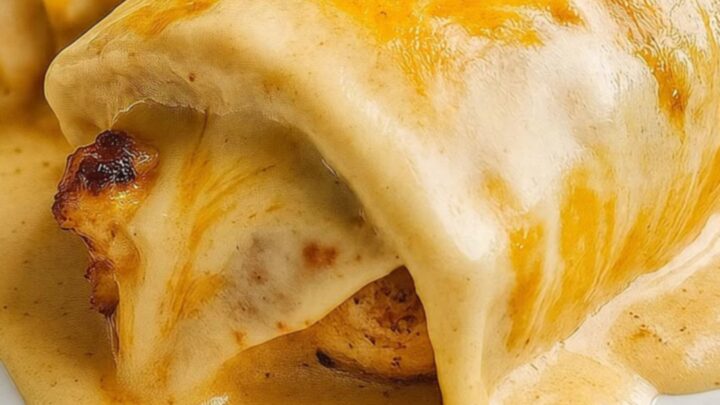
- Bake until bubblyBake the dish uncovered at 375°F (190°C) for 25 to 30 minutes, until the sauce bubbles at the edges and the cheese on top is fully melted and lightly golden. The sauce should look loose and glossy around the rolls, exactly the way it does in the finished dish.Look for Bubbles break slowly at the edges of the dish and the cheese has melted into one glossy, golden layer.Tip Switch the broiler on for the last minute if you want deeper color, watching it the whole time.
- Rest, then lift and serveLet the dish rest 5 minutes out of the oven so the sauce thickens slightly and the rolls hold together. Slide a spatula under one enchilada and lift it out with a long cheese pull, plate it, and cut into it with a fork while the cheese is still stretching. Serve hot.Look for The sauce clings to the roll instead of running, and the cheese stretches in long strands as it is lifted.Tip Resting is what turns a saucy mess into clean portions; the 5 minutes are worth the wait.
Out of the oven, the sauce bubbles at the edges, the cheese is melted into one glossy golden blanket, and the smell is rich with toasted cheese and warm spices. After the 5-minute rest, a spatula lifts each enchilada whole, with the sauce clinging and the cheese stretching in long strands.
A fork cuts through with no resistance and the filling inside looks juicy and creamy, never dry. Serve the first portions immediately while the pull is at its best; the dish stays hot and bubbly on the table for several minutes after.
Common mistakes
The most common failure is cold tortillas: they crack when rolled and split open in the bake, so warm them right before filling. Rolling too tightly is the second trap; overstuffed rolls burst and spill filling into the sauce. Keep each portion at about 1/3 cup. Curdling happens when sour cream meets direct heat, so take the saucepan off the burner before stirring it in. Dry, cracked edges mean the sauce did not cover every tortilla, so spread it all the way into the corners.
How to tell it’s done
The enchiladas are done when three things line up. First, the chicken inside reached 165°F (74°C) when it was seared, which is the safe internal temperature for poultry, and the thermometer should confirm it at the thickest breast.
Second, the sauce bubbles steadily at the edges of the dish, not just in the center, which means the whole pan is hot through. Third, the cheese on top is fully melted, glossy and lightly golden, with no dry patches of exposed tortilla. A fork should slide into a roll with no resistance, and the sauce should cling to it rather than run off.
- Poultry: 165°F (74°C) in the thickest part
Up next · Part 3 of 3
4 variations · storage & make-ahead · 5 answers · printable card
Tips, FAQ & printable recipe (Part 3)← Back to the ingredients (Part 1)