Dinner · Part 2 of 3: Instructions
Cheesy Baked Parmesan Meatloaf for Comforting Dinners Step-by-step instructions
- Prep
- Cook
- Total
- Serves
- 6
Before you start
Before beginning, ensure all ingredients are measured and ready for assembly. Remove the ground beef from the refrigerator approximately 20 minutes before cooking to help it reach a more uniform temperature.
Prepare the baking area by clearing space for the loaf pan and ensuring the oven racks are positioned in the center. Having clean surfaces and all necessary tools, such as a sharp knife and spatula, ready will make the process smooth and efficient.
Ingredients at a glance (4)
- 2 lb ground beef
- 1 cup marinara sauce
- 8 oz mozzarella cheese, shredded
- 1/2 cup parmesan cheese, grated
Instructions
Shaping the foundation
- Prepare and shape the meatloafPreheat the oven to 375°F (190°C). In a large mixing bowl, combine the ground beef with desired seasonings. Shape the mixture into a compact loaf and place it into a loaf pan or directly onto a parchment-lined baking sheet to ensure even browning.Look for The mixture should be firm enough to hold its shape without crumbling.Tip Avoid overworking the meat to ensure the final texture remains tender.
The meat mixture should be well-combined and shaped into a uniform loaf. Ensure the edges are smooth to promote even baking. The loaf should look compact and feel dense to the touch, indicating it will hold its shape throughout the cooking process. Verify that the oven has reached the target temperature before proceeding.
Applying the toppings
- Bake and apply toppingsBake the meatloaf for 40 minutes. Remove the pan from the oven and carefully ladle the marinara sauce over the top, spreading it evenly. Generously sprinkle with the shredded mozzarella and grated parmesan cheese. Return to the oven and bake for an additional 15 minutes until the cheese is bubbling and golden brown.Look for The cheese should be melted, blistered, and golden in color.Safe temperature 160°F (71°C) internal temperature (ground meat)Tip Use a spoon to distribute the sauce evenly to the edges of the loaf.
The meatloaf should be partially cooked and firm to the touch before the sauce and cheese are applied. The marinara should be spread evenly across the top, and the cheese should be distributed edge-to-edge. Look for the sauce to begin bubbling slightly at the sides, signaling that the meat is ready for the final browning.
Final rest and service
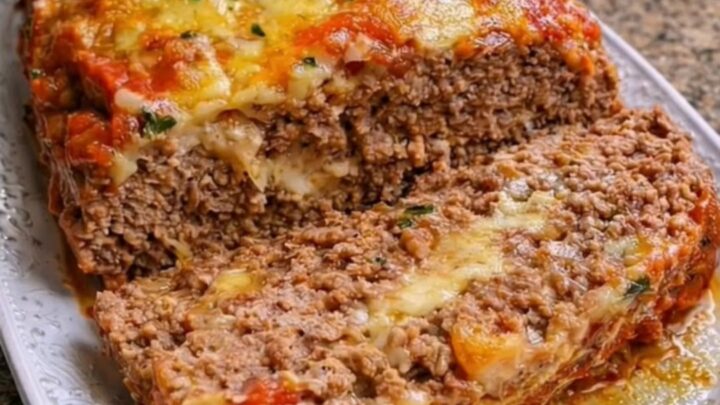
- Rest and serveRemove the meatloaf from the oven and let it rest on the counter for at least 10 minutes. This resting period allows the juices to redistribute throughout the meat, ensuring each slice remains moist. Carefully transfer the meatloaf to an ornate white platter before slicing into thick portions.Look for The meatloaf should be set and easy to lift with a spatula.Tip Use a sharp knife to achieve clean slices through the melted cheese crust.
The meatloaf should appear deeply golden with a beautifully melted, blistered cheese crust. The aroma of roasted cheese and savory beef should be prominent.
Upon resting, the loaf should feel slightly firmer, and the edges of the cheese should look crisp. It is now ready to be sliced into thick, uniform pieces for serving.
Common mistakes
A common mistake is failing to let the meatloaf rest, which often leads to the loaf crumbling when sliced. Always allow the meat to sit undisturbed for at least 10 minutes.
Another error is neglecting to check the internal temperature, which can result in undercooked meat. Avoid overcrowding the pan or using too much sauce, as excess liquid can prevent the cheese from browning correctly.
How to tell it’s done
The meatloaf is considered fully cooked when the internal temperature reaches 160°F (71°C) at the thickest part. Use a reliable digital thermometer to verify this reading.
When done, the exterior should be firm, the sauce bubbling, and the cheese topping visibly browned and blistered. The meat will be succulent, and the juices should run clear when a knife is inserted into the center.
- Ground meat: 160°F (71°C) in the thickest part
Up next · Part 3 of 3
2 variations · storage & make-ahead · 3 answers · printable card
Tips, FAQ & printable recipe (Part 3)← Back to the ingredients (Part 1)