Dinner · Part 2 of 3: Instructions
Charcoal-Grilled Bone-In Ribeye with a Deep Golden Crust Step-by-step instructions
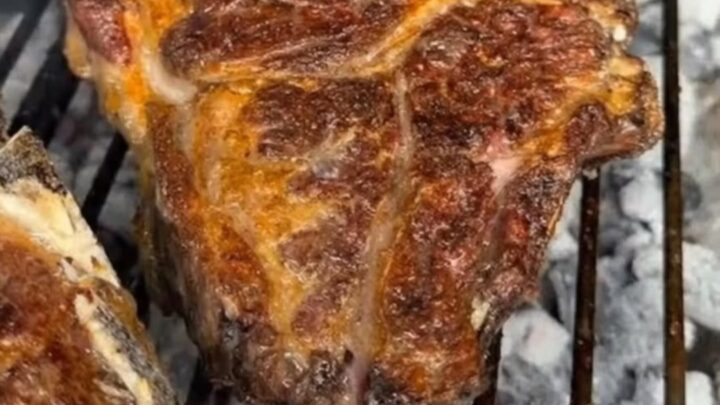
- Prep
- Cook
- Total
- Serves
- 2
Before you start
Take the ribeye out of the refrigerator up to 30 minutes before grilling, no longer, so the surface is not ice-cold when it hits the fire; a steak that starts closer to room temperature sears more evenly. Pat it thoroughly dry with paper towels, since surface moisture turns to steam and blocks browning.
Season all sides, including the fat edge and the bone side, then press the salt and pepper in. Fill the chimney starter, set the cast-iron grates within reach, and have long tongs and the instant-read thermometer on the side table.
Ingredients at a glance (3)
- 1 bone-in ribeye steak, about 1 1/2 inches thick (1 1/2 to 2 lb)
- 2 tsp kosher salt
- 1 tsp coarsely ground black pepper
Instructions
Season and build the fire
- Season the steakPat the ribeye dry on all sides with paper towels, then season every surface generously with kosher salt and coarsely ground black pepper, including the bone side and the fat edge. Press the seasoning in with your hands so it adheres. Let the steak sit on the counter for no more than 30 minutes while the fire gets ready.Look for The surface should look evenly speckled with salt and pepper, with no bare patches of red meat showing through.Tip A dry surface is what browns; blot away every bit of moisture before the seasoning goes on.
By the end of this phase the steak is dry, evenly seasoned on every surface including the bone side, and sitting on the counter for its short 30-minute window while the chimney burns. The coals should be mostly ashed over, glowing orange at the core and pale gray-white outside, with no solid black remaining.
If the coals are not there yet, wait; a lukewarm fire is the single biggest cause of a gray, crustless steak. The grates go on afterward and preheat for about 5 minutes until a water drop skitters and vanishes on contact.
Sear over white-hot coals
- Light a full chimney of charcoalFill a chimney starter with charcoal and light it. Wait for the coals to be mostly ashed over and glowing white-hot at the edges, roughly 15 to 20 minutes. You want serious heat for this steak: the embers should radiate intensely when a hand is held a few inches above the grate.Look for The coals at the top of the chimney glow orange at the center and turn pale gray-white on the outside, with no black edges left.Tip No lighter fluid needed; a chimney starter lights the coals evenly and keeps any fuel taste off the meat.
- Set up two heat zonesPour the white-hot coals into the grill and bank them in a dense, even layer directly under the cast-iron grates for direct searing, leaving one side with fewer coals as a cooler zone. Set the grates in place and let them preheat for 5 minutes until a drop of water skitters and evaporates on contact.Look for The grates are ready when they smoke faintly and a drip of water dances and vanishes within a second or two.Tip The cooler zone is the escape hatch: if flare-ups get aggressive, the steak moves there for a moment.
- Sear hard over the embersLay the steak directly over the hottest coals and leave it undisturbed for 2 to 3 minutes. Expect the fat to render and drip, sending up aromatic smoke and occasional flame flare-ups; that crackle is the crust forming. Do not move the steak while the first side sears.Look for The underside turns deep golden brown with darker charred patches, and the edges of the fat cap begin to bubble and brown.Tip If flames wrap the steak for more than a few seconds, slide it briefly to the cooler zone, then return it.
- Turn and sear the second sideFlip the steak with tongs and sear the second side over the hot coals for another 2 to 3 minutes, letting the fat render and the crust build the same way. Stand the steak up with tongs to sear the fat edge and the bone side for about 1 minute each, pressing gently so they make contact with the grates.Look for Both broad faces show a thick, mahogany crust, and the fat edge is browned and crackling rather than pale and rubbery.Tip Use tongs, never a fork, so the juices stay inside where they belong.
- Finish to a safe temperatureMove the steak to the cooler zone if the exterior is browning faster than the interior climbs, and keep grilling with the lid on, turning every minute or so. Check with an instant-read thermometer in the thickest part away from the bone: pull the steak at 145°F (63°C) for a fully cooked but juicy medium, per USDA guidance. Let the steak rest for at least 3 minutes after it comes off the grill.Look for The thermometer reads 145°F (63°C) in the thickest part of the meat, not touching bone, and the crust is deep golden with charred speckles.Safe temperature 145°F (63°C) internal temperature (steaks, chops and roasts)Tip Aim one or two degrees lower than the target; the temperature keeps rising while the steak rests.
This is the loud, smoky, dramatic phase: fat rendering, drips hitting the coals, flame flare-ups, and that unmistakable crackle of a crust forming. Both broad faces of the steak should now show a thick, deep golden-brown crust with darker charred patches, and the fat edge and bone side should be seared and bubbling rather than pale.
Before moving on, take the temperature: the thickest part, away from the bone, should read close to 145°F (63°C). If the interior lags, finish over the cooler zone with the lid on, turning every minute.
Rest, carve, and serve
- Rest the steakTransfer the ribeye to a cutting board and let it rest for at least 3 minutes, and up to 8 for a thicker cut. The sizzling quiets, the exterior stops steaming, and the juices redistribute through the meat instead of pooling on the board at the first cut. Do not tent it tightly or the crust will soften.Look for After resting, a light sheen of juice appears on the surface of the crust, and the steak no longer hisses.Tip Rest on the board, not a plate covered in foil; trapped steam is the enemy of a crackling crust.
- Carve against the grainCut the meat away from the bone in one long stroke, then slice the boneless slab crosswise into thick strips, cutting against the direction of the muscle fibers. Fan the slices on a warm platter and pour any board juices back over them. Serve right away while the crust is still crisp.Look for The slices show a uniform, juicy pink interior from edge to edge, bordered by a thin band of browned crust.Tip Short strokes with a sharp carving knife tear the crust far less than long sawing ones.
The steak comes off the grill sizzling and goes onto the board for at least 3 minutes, up to 8 for a thick cut. The sizzle fades, a light sheen of juice appears on the crust, and the meat stops steaming.
Cut the meat from the bone in one stroke, slice crosswise against the grain into thick strips, and fan them on a warm platter with the board juices poured over. Every slice should show the same juicy pink interior from edge to edge, framed by a thin band of crust. Serve immediately while the crust still crackles.
Common mistakes
The most common errors are all avoidable. A wet steak steams instead of searing, so blot it dry and season only then. A fire that is not ready, with black-edged coals, gives weak browning and a long, drying cook; wait for white-hot, ashed-over embers. Constant flipping and poking with a fork punctures the meat and prevents a crust from setting; turn the steak only when a side is done. Skipping the rest sends the juices straight onto the board at the first cut.
How to tell it’s done
The reliable test is internal temperature, not color or time. Insert an instant-read thermometer sideways into the thickest part of the meat, avoiding the bone, which reads hotter than the flesh around it. For whole cuts of beef, 145°F (63°C) is the safe target with a juicy, fully cooked interior; pull the steak one or two degrees early to account for carryover. Visually, the crust should be deep golden mahogany with darker charred speckles, the fat cap browned and bubbling, and the bone side seared.
- Steaks, chops and roasts: 145°F (63°C) in the thickest part, then a 3-minute rest
Up next · Part 3 of 3
4 variations · storage & make-ahead · 5 answers · printable card
Tips, FAQ & printable recipe (Part 3)← Back to the ingredients (Part 1)