Desserts · Part 1 of 3: Ingredients
Chai Spiced Pear Cake with Salted Caramel Mascarpone
- Prep
- Cook
- Total
- Serves
- 10
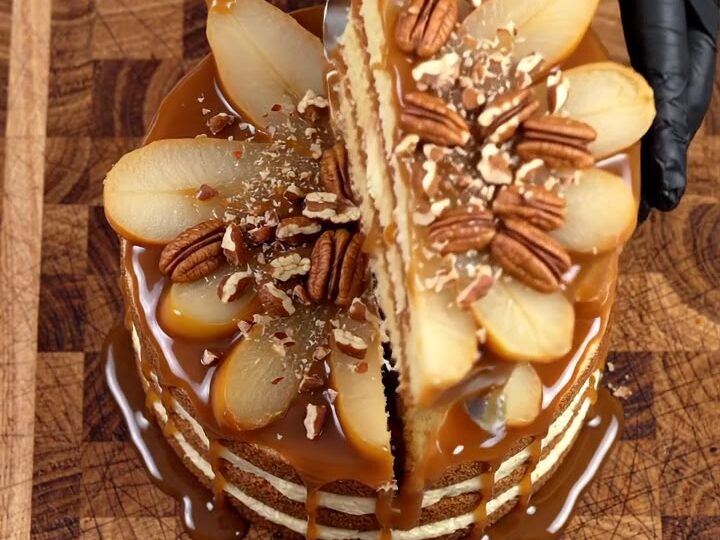
This chai spiced pear cake brings together the warm flavors of chai, tender caramelized pears, and a billowy cinnamon mascarpone cream, all crowned with glossy salted caramel and delicate chocolate curls.
The finished cake is a tall, dramatic dessert that looks like it came from a fancy bakery, yet comes together with store-bought cake layers and a few simple techniques. Perfect for a special occasion or a weekend baking project, this slice is as beautiful as it is delicious.
Imagine a slice of cake that layers spiced pear, creamy mascarpone, and glossy caramel, with a crunch of toasted pecans and a whisper of chocolate. This recipe turns that vision into reality. Using pre-baked chai spiced cake layers, you can focus on the showstopping elements: the caramelized pears, the cinnamon mascarpone cream, and the salted caramel glaze.
The result is a dessert that feels indulgent and sophisticated, yet is surprisingly straightforward to assemble. Whether you are celebrating a birthday or simply want to impress dinner guests, this cake delivers on every level.
Ingredients
- 4 ripe but firm pears (such as Bosc or Anjou)
- 1 cup pecan halves, toasted and chopped
- 6 oz spiced caramel milk chocolate, grated into curls
Cinnamon Mascarpone Cream
- 2 cups mascarpone cheese, chilled
- 1 cup heavy cream
- 1/2 cup confectioners' sugar
- 1 tsp ground cinnamon
Salted Caramel Glaze
- 1 cup salted caramel sauce, homemade or store-bought
Cake
- 2 9-inch chai spiced cake layers, baked and cooled
Why this recipe works
The combination of chai spices and pear is a classic pairing that warms the palate. The chai spice in the cake layers echoes the cinnamon in the mascarpone cream, creating a cohesive flavor profile.
Caramelizing the pears intensifies their natural sweetness and adds a depth that raw pears lack. The salted caramel glaze ties everything together with its salty-sweet contrast, balancing the richness of the mascarpone and chocolate.
Using store-bought or pre-baked cake layers saves time without sacrificing quality. The mascarpone cream is light and airy, thanks to the whipped heavy cream, and provides a luxurious texture that complements the dense cake.
The grated chocolate curls add a subtle crunch and visual appeal, while the toasted pecans bring a nutty earthiness. Each component is simple on its own, but together they create a harmonious and impressive dessert.
Notes and substitutions
Choose pears that are ripe but still firm, such as Bosc or Anjou, so they hold their shape when fanned and caramelized. The spiced caramel milk chocolate can be found in specialty stores, but regular milk chocolate with a pinch of chai spice works as a substitute. For the mascarpone cream, ensure both the mascarpone and heavy cream are well chilled before whipping to achieve stiff peaks without curdling.
The salted caramel sauce can be homemade or store-bought; if using store-bought, warm it slightly to make it pourable. The cake layers can be baked ahead and frozen, or you can use a high-quality store-bought spice cake. When grating the chocolate, chill it first for the best curls. The assembled cake should be kept refrigerated until serving, but let it sit at room temperature for 10 minutes before slicing for the best texture.
- spiced caramel milk chocolate: Use regular milk chocolate and add 1/2 teaspoon of chai spice mix to the grated curls.
- mascarpone cheese: Substitute an equal amount of cream cheese softened, but reduce the confectioners' sugar to 1/4 cup.
- salted caramel sauce: Make a quick caramel by melting 1 cup sugar with 6 tablespoons butter and 1/2 cup cream, then add 1 teaspoon flaky salt.
- chai spiced cake layers: Use a store-bought spice cake mix and add 1 tablespoon chai spice blend to the dry mix.
Equipment
- Box grater
- Piping bag with star tip
- Metal cake server
- Sharp chef's knife
- Cutting board
- Mixing bowls
- Electric mixer
- Offset spatula
Up next · Part 2 of 3
7 steps · 35 min of cooking · what to look for at each stage
Step-by-step instructions (Part 2)