Desserts · Part 2 of 3: Instructions
Cashew Coconut Brittle Salted Caramel Chocolate Bark Step-by-step instructions
- Prep
- Cook
- Total
- Serves
- 16
Before you start
Gather every ingredient and tool before you melt any chocolate, because the bark has to be assembled while the chocolate is still soft. Line a rimmed baking sheet with parchment and leave enough overhang to lift the finished slab later. Set a wooden cutting board on the counter with your large knife and a long knife nearby.
Grate the milk chocolate block on the box grater, and keep the shavings on a small plate so they are ready to sprinkle. Chop the cashew coconut brittle into irregular pieces, and keep it, the coconut flakes and the whole cashews together in a bowl. Measure the salted caramel and the flaky salt. Keep the baking sheet close to the refrigerator so you can move it quickly once the toppings are down.
Ingredients at a glance (7)
- 1 cup cashew coconut brittle, store-bought or made ahead, chopped into irregular pieces
- 1/4 cup toasted coconut flakes
- 1/2 cup whole cashews, roughly chopped for scattering
- 2 oz milk chocolate, in a block, for grating
- 12 oz dark chocolate, chopped, melted
- 1/2 cup salted caramel sauce, store-bought or made ahead, for swirling
- flaky salt, for finishing, to taste
Instructions
Melt and layer the chocolate
- Prepare the toppingsSet a wooden cutting board on the counter. Chop the cashew coconut brittle with a large knife into irregular pieces, mixing in the coconut flakes and scattering the whole cashews alongside. Keep the mixture within easy reach.Look for Brittle pieces should be irregular, with coconut flakes and nuts mixed throughout.Tip Chop the brittle just before using so it stays crisp and does not absorb moisture.
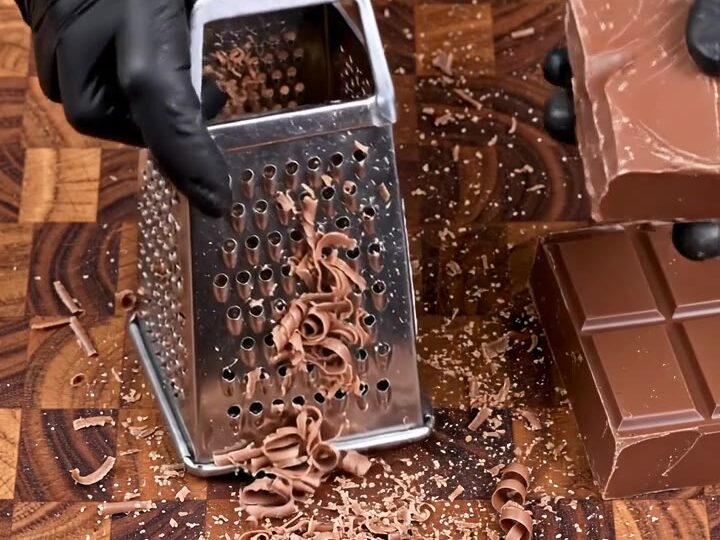
- Grate the milk chocolateHold the block of milk chocolate against the coarse side of a box grater. Grate it over a small plate or sheet of parchment, letting fine curls and shavings collect in a loose pile for sprinkling later.Look for Fine curls and shavings should fall easily from the block.Tip Chill the chocolate block for 10 minutes first so it grates into cleaner curls.
The melted dark chocolate should be smooth and glossy, spread into an even layer across the parchment-lined sheet. Check that no lumps remain and that the edges are reasonably level, because thick spots will set unevenly. Swirl the salted caramel across the surface in spaced dollops, then drag a knife through them so the ribbons show clearly.
The caramel should look distinct from the chocolate and should not have sunk completely into it. Before going on, confirm that the coating is still soft enough to accept the toppings, and that you can sprinkle without the surface beginning to tighten or dull. If the chocolate starts to firm, warm it briefly in a short burst in the microwave, and then continue quickly.
Top the bark while soft
- Melt and spread the dark chocolateMelt the chopped dark chocolate in a microwave-safe bowl in 30-second bursts, stirring between each. Line a rimmed baking sheet with parchment and pour the melted chocolate onto it, spreading it into an even layer with an offset spatula.Look for The chocolate should be smooth, glossy and fluid enough to spread evenly.Tip Stop heating when a few lumps remain and stir them out, so the chocolate does not overheat.
- Add the caramel swirlsSpoon the salted caramel sauce across the surface of the melted chocolate in spaced dollops. Drag a knife or skewer through them to create swirls, keeping the coating visible between the caramel streaks.Look for Caramel should form visible ribbons across the chocolate without fully blending in.Tip Warm the caramel slightly if it is very thick so it swirls more easily.
- Scatter the toppings while softWhile the chocolate is still soft, sprinkle the chopped brittle, coconut flakes and whole cashews generously over the caramel and chocolate. Press them gently so they stick, then finish with a light scatter of flaky salt and the grated milk chocolate.Look for Toppings should sink slightly into the surface without sliding off.Tip Work quickly so the toppings adhere before the chocolate firms up.
The surface should now hold chopped brittle, coconut flakes, whole cashews and grated milk chocolate, each pressed gently so it stays in place. The toppings should sit partly within the coating and should not slide when you tilt the sheet slightly. Finish with a light scatter of flaky salt so the grains catch the light on top. Look for even coverage with no bare patches of caramel and no clumps of nuts piled in one spot. Check that the caramel ribbons remain visible between the toppings. Before moving the sheet, make sure the entire surface is covered and that nothing is loose, because loose pieces will fall away once the chocolate sets and cuts.
Set and cut the slab
- Let the chocolate setPlace the baking sheet in the refrigerator for about 30 minutes, or until the chocolate is firm to the touch and no longer tacky. Keep it flat so the layers set evenly and the surface stays glossy.Look for The surface should feel firm and look glossy, with no soft spots.Tip Keep the sheet level in the refrigerator so the bark sets with an even thickness.
- Cut the bark into barsLift the parchment and slab from the sheet and set it on the cutting board. Using a long knife, press straight down or slice through the bark to cut rectangular bars with clean, snappable chocolate edges.Look for The bark should break cleanly along the cut and show a firm, glossy interior.Tip Wipe the knife between cuts with a warm, dry towel to keep the edges neat.
- Serve the barkArrange the rectangular pieces on a serving plate. Drizzle a little extra salted caramel over the top, add a few whole cashews, and finish with a pinch of flaky salt so each bar shows its toppings.Look for Bars should look glossy, with caramel drizzles and nuts visible on top.Tip Serve at room temperature for the best snap, or chill briefly if the day is warm.
After chilling, the chocolate should be firm, dry to the touch and glossy, with no soft spots or tacky areas when you press lightly with a finger. Lift the parchment and slab onto the cutting board and check that it holds its shape. Use a long knife to cut straight through the bark, pressing firmly or slicing with a gentle sawing motion. The bars should break along clean lines and show crisp, snappable chocolate edges with the toppings still embedded. Before cutting, make sure the slab is cold and firm enough to hold its shape. If it is still soft, return it to the refrigerator for a few more minutes.
Common mistakes
The most common mistake is overheating the dark chocolate. If it is melted too fast or for too long, it can seize, turn thick and lose its gloss, which leads to a dull, grainy bark. Melt it gently in short bursts and stir between each one until it is smooth. Another frequent problem is adding the toppings too late.
Once the chocolate has begun to firm, the brittle, nuts and milk chocolate shavings will not stick and will fall away during cutting. Work steadily so each step follows the last while the coating is still workable. Also avoid spreading the chocolate too thinly, since a thin layer breaks unevenly and can crack into shards rather than clean bars. Finally, do not cut the bark while it is still soft.
How to tell it’s done
The bark is ready when the chocolate is firm, dry and glossy all the way through the slab. Press the surface gently with a fingertip: it should feel solid and should not leave a mark or feel tacky. The caramel ribbons should look set rather than wet, and the toppings should stay fixed when you lift the parchment. When you cut a test bar, the edge should snap cleanly with a crisp break and no crumbling.
This recipe does not include a protein or an egg component, so no internal temperature applies. For the best texture, the chocolate should be firm enough to cut cleanly while still cool to the touch. If the slab feels soft or the surface looks dull or streaky, return it to the refrigerator for a few more minutes before cutting.
Up next · Part 3 of 3
4 variations · storage & make-ahead · 5 answers · printable card
Tips, FAQ & printable recipe (Part 3)← Back to the ingredients (Part 1)