Appetizers · Part 2 of 3: Instructions
Carne Asada Waffle Fry Nachos with Jalapeño Queso Step-by-step instructions
- Prep
- Cook
- Total
- Serves
- 6
Before you start
Before anything meets heat, set up the whole pan. Move an oven rack to the center position and position the broiler element within easy reach. Pat the cubed skirt steak completely dry with paper towels, then toss it with taco seasoning so every face is coated.
Line up the shredded cheddar-jack, warm the jalapeño queso blanco in a small saucepan or the microwave until it pours smoothly, and have the guacamole, sour cream, pickled jalapeños and cotija ready at room temperature. Pull the waffle fries from the freezer and grab an oven-safe skillet plus a rimmed baking sheet. Once the fries go in, this recipe moves quickly, so a two-minute setup now keeps the final assembly hot and unhurried.
Ingredients at a glance (10)
- 8 oz skirt steak, cut into small cubes
- 1 tbsp taco seasoning
- 1 tbsp neutral oil, for charring the steak
- 1 1/2 lb frozen waffle fries, seasoned
- 1 1/2 cups shredded cheddar-jack cheese
- 1 cup jalapeño queso blanco, hot (store-bought or made ahead)
- Guacamole, large scoops, for serving
- Sour cream, for serving
- Pickled jalapeños, for serving
- Cotija cheese, crumbled, for serving
Instructions
Crisp the base
- Heat the oven and set upPosition a rack in the center of the oven and heat it to 425°F (220°C). Set a large cast-iron skillet or rimmed baking sheet nearby, and pat the cubed skirt steak completely dry with paper towels so it will char instead of steam when it hits the pan.Look for The oven reads a steady 425°F and the steak surface feels dry to the touch.Tip Dry meat browns; wet meat steams. Two minutes with paper towels changes the whole sear.
- Bake the waffle friesSpread the seasoned waffle fries in a single layer on the baking sheet, leaving space between them so hot air can circulate. Bake for 18 minutes, turning once halfway through, until the edges are deep golden and the fries sound crisp when tapped with a spatula.Look for Deep golden edges and a hollow, crisp tap when the spatula lands on a fry.Tip Crowding traps steam and softens the fries, so use two pans rather than one packed sheet.
- Char the skirt steakHeat the oil in a cast-iron skillet over high heat until it shimmers. Toss the steak cubes with the taco seasoning, add them in one layer and sear undisturbed for a minute before tossing. Cook until charred outside and cooked to 145°F (63°C) inside, then let the meat rest at least 3 minutes.Look for Dark, crackling char on at least two sides of each cube, 145°F (63°C) at the center.Safe temperature 145°F (63°C) internal temperature (steaks, chops and roasts)Tip Work in two batches if the pan fills; crowded cubes release juice and gray out instead of charring.
By the end of this phase the kitchen should smell like a steakhouse. The fries come out deep golden with glassy, crackling edges that tap hollow under a spatula, and they should feel dry, not oily. The steak cubes show dark char on at least two faces, glisten with juice at the center, and have rested a full 3 minutes after hitting 145°F (63°C). Before assembling, taste one fry for salt and one steak cube for seasoning — this is the last easy moment to adjust either, because once the cheese blanket goes on, the base is buried and locked in.
Melt and broil
- Pile the skilletTransfer the hot fries to an oven-safe skillet or back onto the cast-iron pan. Scatter the charred steak cubes evenly across the fries, then blanket everything with the shredded cheddar-jack, pushing a good amount toward the edges where it will crisp against the hot pan.Look for No bare fries visible and cheese reaching the pan edges for crispy lace.Tip Build the pile while everything is hot so the cheese begins melting on contact.
- Add queso and broilPour the hot jalapeño queso blanco evenly over the pile, letting it run into the gaps between the fries. Slide the skillet under the broiler set to 475°F (245°C) and broil for about 2 minutes, watching constantly, until the cheese bubbles at the edges and shows browned spots.Look for Queso bubbling at the edges and cheddar freckled with deep golden patches.Tip Keep the skillet under the broiler in sight the entire time; two minutes goes fast.
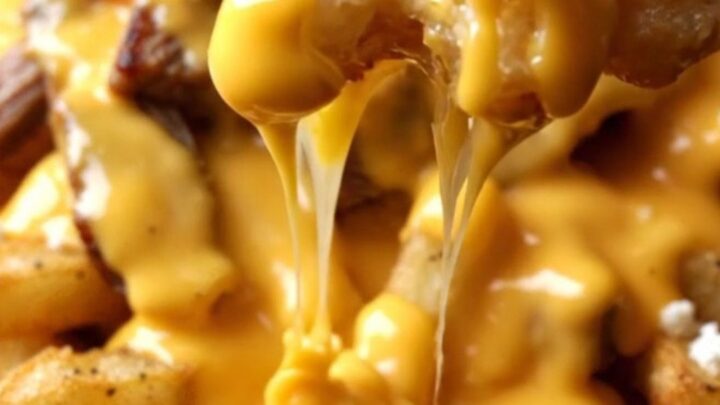
The skillet leaves the broiler looking like the best bar food in the room. The queso is visibly bubbling at the edges of the pan, the cheddar-jack has melted into the queso with browned, freckled spots across the top, and the cheese touching the skillet walls has fried into crispy lace.
The whole surface should tremble when the pan is set down — molten all the way through, not set or skinning over. Listen for a faint sizzle as the pan comes out; that sound means the cheese is still at temperature. Move to toppings within a minute so nothing starts to firm up.
Top and serve
- Add the cool toppingsPull the skillet from the broiler and set it on a trivet. Drop large scoops of fresh guacamole and spoonfuls of sour cream over the hot nachos, spacing them so every slice from the pan picks up both. The contrast of cool toppings on bubbling cheese is the whole point.Look for Queso still glossy and loose-topped but no longer actively bubbling.Tip Add the cold toppings only after broiling; heat turns guacamole dull and sour cream grainy.
- Finish with pickled heat and cotijaScatter pickled jalapeño slices across the top, letting a few fall into the crevices, then shower everything with crumbled cotija. The briny pickle cuts through the rich queso while the cotija adds a salty, crumbly finish that clings to the melted cheese.Look for Bright green jalapeño slices and white cotija speckled across the entire surface.Tip Crush the cotija between your fingers over the pan so it falls in uneven, clingy crumbles.
- Serve straight from the skilletCarry the skillet to the table on a trivet while the queso is still molten and lift a loaded fry to check the pull. Serve immediately with extra pickled jalapeños on the side, and remind everyone to dig from the edges where the cheese crisps first.Look for A long cheese pull when the first fry lifts and fries that crackle, not bend.Tip Nachos wait for no one; plate drinks and napkins before the skillet comes out.
The finished skillet carries cool green guacamole scoops and white sour cream dollops sitting proud on the molten cheese, pickled jalapeño slices scattered bright across the top, and cotija clinging in uneven crumbles everywhere. The first fry lifted should pull a long cheese strand and crackle on the way up. Check that every quadrant of the pan has guacamole, cream, pickle and cheese — guests dig from where they sit, and an unbalanced corner gets picked over last. Serve within two minutes of finishing; the window between molten and merely warm is short.
Common mistakes
The most common failure is crowding the fries on the baking sheet, which steams them into limpness before the toppings ever arrive; use two sheets if needed. The second is searing wet, crowded steak cubes — they gray out and release juice instead of charring, so dry them well and work in batches.
Pouring cold queso is another quiet killer: it clumps on contact instead of flowing into the gaps, so warm it until it pours. Finally, never walk away from the broiler. Two minutes at 475°F is the difference between bubbling, browned cheese and a scorched skillet, and broilers vary widely from oven to oven.
How to tell it’s done
The nachos are done when three things are true at once. The fries beneath the toppings still snap when a fork presses one near the edge of the pan, not just at the exposed rim. The cheddar-jack shows deep golden patches and the queso bubbles visibly at the skillet's edge.
And a test fry lifted from the center comes up trailing a long strand of molten cheese rather than sliding off bare. The steak should have registered 145°F (63°C) with a 3-minute rest during the sear, so it finishes juicy and fully cooked. If the cheese browns before it bubbles, the broiler runs hot — drop the rack one level next time.
- Steaks, chops and roasts: 145°F (63°C) in the thickest part, then a 3-minute rest
Up next · Part 3 of 3
4 variations · storage & make-ahead · 5 answers · printable card
Tips, FAQ & printable recipe (Part 3)← Back to the ingredients (Part 1)