Desserts · Part 2 of 3: Instructions
Caramelized Pear Tart with Honey and Walnuts in 45 Minutes Step-by-step instructions
- Prep
- Cook
- Total
- Serves
- 8
Before you start
Thaw the puff pastry in the refrigerator for several hours or overnight, and keep it cold until you need it. Set the oven rack in the center and heat the oven to 400°F (200°C). Place a sheet of parchment paper on the wooden board and have the chef's knife, box grater, pastry brush, sheet pan and serving spatula within reach.
Peel and slice the pears just before assembling so they do not brown. Chop the walnuts and pick the rosemary leaves. Set aside 2 tablespoons of honey for brushing and 1 tablespoon for finishing. Keeping everything ready means the pastry stays cold and the tart goes into the oven without delay.
Ingredients at a glance (6)
- 1 sheet puff pastry, store-bought or made ahead, thawed
- 3 ripe yellow pears, peeled and sliced
- 2 oz hard white cheese, such as Parmesan, for grating
- 1/2 cup walnuts, chopped, plus more for garnish
- 3 tbsp honey, divided
- 1 sprig fresh rosemary, leaves picked, for garnish
Instructions
Assembling the tart base
- Prepare the pastry and fruitSet the oven rack in the center and heat the oven to 400°F (200°C). Unroll the thawed puff pastry on a sheet of parchment paper on a wooden board. Peel the pears, cut them in half, remove the cores, and slice them thinly with a chef's knife. Chop the walnuts and pick the rosemary leaves.Look for Pastry lies flat and cold, pear slices are even and thin.Tip Keep the pastry cold until it goes into the oven so it puffs well.
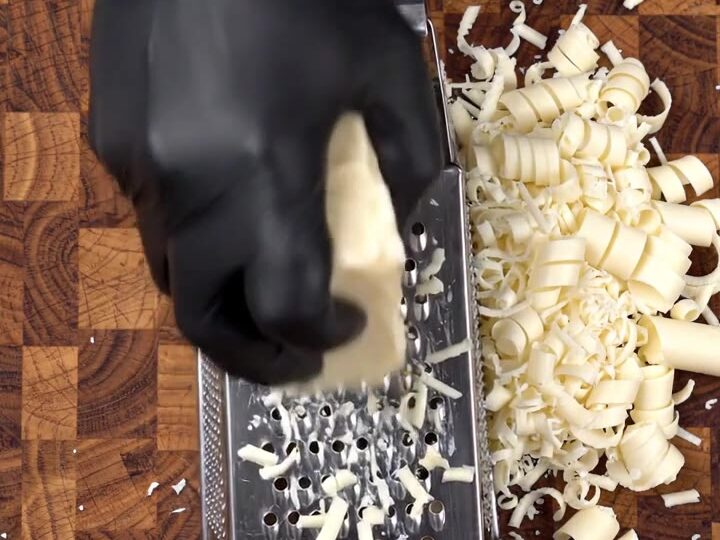
- Grate the cheese over the baseGrate the hard white cheese on the large holes of a box grater so fine shavings fall directly onto the board. Spread the grated cheese evenly over the pastry, leaving a small border around the edges for the pastry to rise.Look for An even, thin layer of cheese covers the pastry without bare spots.Tip Grate the cheese just before using so it stays dry and fluffy.
At the end of this phase the pastry should lie flat on the parchment with an even layer of grated hard white cheese spread across it, leaving a thin border around the edges. The cheese should look dry and fluffy, not clumped, and the pastry should feel cool to the touch.
Check that no bare patches of pastry remain under the cheese and that the pear slices are thin and even, ready to fan out. If the pastry has softened and feels sticky, return it to the refrigerator for about 10 minutes before going on, since cold pastry gives the best rise and the most even puff in the oven.
Layering pears and baking
- Layer the pears and walnutsFan the pear slices out in overlapping rows across the pastry. Tuck the chopped walnuts between the slices so they sit in the gaps. Brush the pears and the exposed pastry edges with 2 tablespoons of the honey.Look for Overlapping pear rows cover the pastry, with walnuts visible between them.Tip Arrange the pear slices in a tight circle for a neat, round tart.
- Bake until puffed and goldenSlide the tart on its parchment onto a sheet pan. Bake for 20 to 25 minutes, until the pastry is puffed and deep golden brown and the pear edges have caramelized and darkened at the tips.Look for Pastry is puffed, deep golden, and the pear edges look caramelized.Tip Rotate the sheet pan halfway through for an even color.
At the end of this phase the pear slices should be fanned in overlapping rows across the whole base, with walnut pieces tucked between them and the honey glaze brushed over the fruit and pastry edges. The pears should look glossy and bright, and the tart should sit on the sheet pan in a neat round shape. Check that the pastry edges are not covered by fruit, so they can rise and turn golden. Once the tart is in the oven, look for the pastry to puff and the pear tips to darken and caramelize, which signals that the bake is progressing as it should.
Finishing and slicing the tart
- Finish with honey and walnutsTransfer the baked tart to a cutting board and let it rest for about 5 minutes. Drizzle with the remaining tablespoon of honey, then scatter walnut crumbs and rosemary leaves over the top.Look for Honey glistens on the warm pears and garnish sits evenly on top.Tip Add the honey while the tart is still warm so it settles into the pears.
- Slice and serve the wedgesCut the round tart into wedges with a serving spatula, lifting each slice carefully so the layers stay intact. Serve warm or at room temperature, showing the crisp pastry, tender pears and crunchy walnuts.Look for Wedges hold their shape with crisp layers and glossy pear pieces.Tip Use a sharp serrated knife or spatula to keep the pastry flaky.
At the end of this phase the baked tart should be deep golden with puffed, flaky edges and caramelized pear pieces at the surface. After resting for about 5 minutes on the cutting board, the honey drizzle should look glossy and the walnut crumbs and rosemary leaves should sit evenly on top. Check that the tart holds its shape when lifted and that the layers look crisp rather than damp. Cut the tart into wedges with the serving spatula, lifting each slice gently so the layers and the caramelized fruit stay together on the plate.
Common mistakes
The most common problem is a soggy base. This usually happens when the pears are too ripe or too juicy, or when the cheese is spread too thickly and does not dry out in the oven. Slice the pears thinly and pat them dry if they look wet. Another frequent mistake is covering the pastry edges with fruit or honey, which stops them from rising and turning golden.
Keep the border clear and brush only the pastry edges lightly. Baking in an oven that is not fully heated also leads to a flat, pale base, so check that the oven has reached 400°F (200°C) before the tart goes in. Finally, avoid cutting the tart while it is very hot, as the layers can slide apart.
How to tell it’s done
The tart is ready when the pastry is puffed, deep golden brown and crisp to the touch, with no pale or doughy areas in the center. The pear edges should look caramelized and darkened at the tips, and the honey should have turned glossy and slightly sticky on the fruit.
Lift a corner gently with a spatula to check the underside, which should be golden and firm rather than soft. A thin knife slipped under the base should meet resistance. This dish contains no raw protein, so there is no meat or egg temperature to reach, but a fully baked, deeply colored base gives the best flavor and texture.
Up next · Part 3 of 3
4 variations · storage & make-ahead · 5 answers · printable card
Tips, FAQ & printable recipe (Part 3)← Back to the ingredients (Part 1)