Desserts · Part 2 of 3: Instructions
Brown Butter Chocolate Chip Skillet Pizookie with Sea Salt Step-by-step instructions
- Prep
- Cook
- Total
- Serves
- 6
Before you start
Before starting, measure all ingredients and chop the dark chocolate into chunks if using a bar. Bring the egg and egg yolk to room temperature if possible, as they incorporate more smoothly into the brown butter.
Preheat the oven to 350°F (175°C) and lightly butter the 8-inch cast iron skillet. Have a small saucepan ready for browning the butter, and a large mixing bowl for combining the dough. The entire process is quick, so having everything prepared will make it seamless.
Ingredients at a glance (11)
- 1/2 cup unsalted butter
- 1/2 cup dark brown sugar
- 1/4 cup white sugar
- 1 large egg
- 1 large egg yolk
- 1 tsp vanilla extract
- 1 cup all-purpose flour
- 1/2 tsp baking soda
- 150 g dark chocolate chunks
- flaky sea salt, for sprinkling, to taste
- vanilla bean ice cream, for serving
Instructions
Make the Brown Butter Dough
- Brown the ButterMelt the butter in a small saucepan over medium heat. Continue cooking, swirling the pan occasionally, until the butter foams and then turns a deep amber color with a nutty aroma, about 3 to 4 minutes. Remove from heat and pour into a large mixing bowl to cool slightly.Look for The butter should be golden brown with dark specks at the bottom of the pan and smell nutty.Tip Watch closely: the butter can go from browned to burnt quickly. The foam will subside when it's ready.
- Whisk Sugars into ButterAdd the dark brown sugar and white sugar to the warm brown butter. Whisk vigorously until the mixture is thick, glossy, and well combined, about 1 minute. The mixture should look like a smooth paste.Look for The sugar mixture should be glossy and slightly thickened, with no lumps of sugar.Tip Whisking while the butter is still warm helps dissolve the sugar, creating a shiny base.
- Add Egg, Yolk, and VanillaAdd the egg, egg yolk, and vanilla extract to the sugar-butter mixture. Whisk until fully incorporated and the batter is smooth and cohesive, about 30 seconds. The mixture may look slightly separated at first but will come together.Look for The batter should be smooth, glossy, and slightly thick, with no streaks of egg.Safe temperature 160°F (71°C) internal temperature (egg dishes)Tip Ensure the butter is not too hot before adding eggs, or they may scramble. It should be warm but not steaming.
- Fold in Dry IngredientsAdd the flour and baking soda to the wet mixture. Use a rubber spatula to fold gently until just combined and no streaks of flour remain. The dough will be thick and slightly sticky.Look for The dough should be uniformly mixed, with a soft, scoopable texture.Tip Do not overmix once the flour is added, or the pizookie will be tough. Fold just until incorporated.
- Fold in Chocolate ChunksAdd the dark chocolate chunks to the dough and fold with the spatula until they are evenly distributed throughout. Reserve a few chunks to press on top before baking.Look for Chocolate chunks should be evenly distributed, with some visible on the surface of the dough.Tip Chop the chocolate into varied sizes—some large, some small—for pockets of melted chocolate.
The brown butter should be amber with a nutty aroma, and the sugar mixture should be glossy and thick. After adding the eggs, the batter should be smooth and cohesive.
The dough will be soft and slightly sticky, with chocolate chunks evenly distributed. This phase takes about 10 minutes and sets the stage for the perfect texture.
Bake to Golden Perfection
- Press Dough into SkilletLightly butter an 8-inch cast iron skillet. Transfer the dough into the skillet and press it into an even layer, smoothing the top with the spatula. Press the reserved chocolate chunks into the surface of the dough.Look for The dough should cover the bottom of the skillet evenly, about 1 inch thick.Tip Buttering the skillet ensures easy release and adds a crisp, golden edge.
- Bake the PizookiePreheat the oven to 350°F (175°C). Bake the pizookie for 18 minutes, until the edges are golden brown and crisp, and the center is set but still soft and slightly underdone. A toothpick inserted near the center should come out with moist crumbs.Look for The edges will look firm and browned, while the center will be puffed and slightly soft to the touch.Safe temperature 160°F (71°C) internal temperature (egg dishes)Tip Bake on the middle rack. The center will continue to set slightly as it cools, so don't overbake.
The pizookie should be golden brown on the edges, with a crackly top and a center that looks set but still soft. The kitchen will smell of brown butter and chocolate. The edges will be firm to the touch, while the center gives slightly. This is the moment to pull it from the oven—overbaking will ruin the gooey center.
Finish with Salt and Ice Cream
- Sprinkle with Sea SaltRemove the skillet from the oven and immediately sprinkle the hot pizookie with flaky sea salt. The salt will cling to the surface and balance the sweetness.Look for The salt crystals should be visible on the surface, adding a savory crunch.Tip Use flaky sea salt, not fine table salt, for the best texture and flavor.
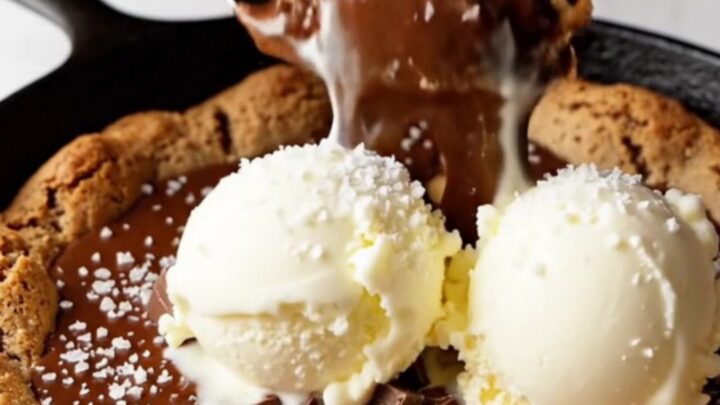
- Top with Ice CreamScoop two generous scoops of vanilla bean ice cream onto the warm pizookie. Let the ice cream begin to melt into the crevices of the cookie.Look for The ice cream should start to soften and melt slightly where it touches the warm cookie.Tip Serve immediately while the cookie is warm and the ice cream is cold for the best contrast.
- Serve and EnjoyScoop portions directly from the skillet with a large spoon, making sure to get some crisp edge and gooey center in each serving. Serve warm with extra ice cream if desired.Look for Each spoonful should have a crunchy edge, gooey center, and melted chocolate.Tip For the full experience, eat straight from the skillet with spoons—it's meant to be shared.
The flaky sea salt should be sprinkled evenly over the hot surface, and the ice cream should begin to melt as soon as it touches the warm cookie. The contrast of hot and cold, sweet and salty, is the final touch that makes this dessert irresistible. Serve immediately for the best experience.
Common mistakes
Common mistakes include overbaking, which dries out the center and makes the cookie tough. Keep a close eye on the oven and pull the pizookie out when the center is just set.
Another mistake is adding the eggs to butter that is too hot, which can scramble them—let the brown butter cool for a few minutes. Also, be sure to press the dough evenly into the skillet so it bakes uniformly. Finally, don't skip the sea salt—it balances the sweetness and enhances the flavors.
How to tell it’s done
The pizookie is done when the edges are deep golden brown and crisp, and the center is set but still soft and slightly underdone. A toothpick inserted near the center will come out with moist crumbs, not wet batter.
The top should be crackly and the chocolate chunks should be melted and shiny. The internal temperature of the egg-based dough should reach 160°F (71°C) to ensure the eggs are fully cooked. Let it cool for a few minutes before adding the ice cream, but serve while still warm.
- Egg dishes: 160°F (71°C) in the thickest part
Up next · Part 3 of 3
4 variations · storage & make-ahead · 5 answers · printable card
Tips, FAQ & printable recipe (Part 3)← Back to the ingredients (Part 1)