Desserts · Part 2 of 3: Instructions
Brown Butter Brookies with a Fudgy Brownie Top Step-by-step instructions
- Prep
- Cook
- Total
- Serves
- 16
Before you start
Before starting, take the eggs out of the refrigerator so they come to room temperature. Measure all ingredients and have them ready. Line an 8x8-inch baking pan with parchment paper, leaving overhang on two sides.
Set a small saucepan over medium heat for browning the butter, and have a large mixing bowl, a whisk, and a rubber spatula within reach. The oven should be preheated to 350°F (175°C) when you are ready to bake.
Ingredients at a glance (11)
- 1 cup unsalted butter
- 1 cup packed light brown sugar
- 1/2 cup granulated sugar
- 2 large eggs
- 2 tsp vanilla extract
- 1 1/2 cups all-purpose flour
- 1/2 tsp baking soda
- 1/2 tsp kosher salt
- 1 cup semi-sweet chocolate chips
- 1/2 cup unsweetened cocoa powder
- 1/2 tsp baking powder
Instructions
Prep and mix the batters
- Brown the butter and mix the cookie doughMelt the butter in a small saucepan over medium heat. Cook, swirling occasionally, until the butter turns golden brown and smells nutty, about 5 minutes. Pour the browned butter into a large mixing bowl and let it cool for 5 minutes. Add the brown sugar and granulated sugar, then whisk until combined. Whisk in the eggs one at a time, followed by the vanilla. In a separate bowl, whisk together the flour, baking soda, and salt.Look for The dough is thick, glossy, and studded with chocolate chips.Tip Cool the browned butter so the eggs don't scramble when added.
- Make the brownie batterIn a separate bowl, whisk the remaining browned butter (if any) with the granulated sugar and brown sugar. Add the eggs and vanilla, and whisk until smooth. Sift in the cocoa powder, flour, baking powder, and salt, and stir until the batter is thick and glossy. The batter should be dark and shiny, with no dry streaks.Look for The brownie batter is thick, dark, and falls from the spatula in a ribbon.Tip Do not overmix; stop as soon as the flour disappears.
The browned butter smells nutty and has turned a deep amber. The cookie dough is thick, glossy, and studded with chocolate chips. The brownie batter is dark, thick, and falls from the spatula in a slow ribbon. Both batters are smooth with no streaks of flour.
Layer and bake
- Layer the batters in the panHeat the oven to 350°F (175°C). Line an 8x8-inch baking pan with parchment paper, leaving overhang on two sides. Spread the cookie dough evenly into the bottom of the pan, pressing it into an even layer. Pour the brownie batter over the cookie dough and spread it gently to cover the surface completely.Look for The pan has a smooth, even cookie layer topped with a dark brownie layer.Tip Use an offset spatula to spread the brownie batter without disturbing the cookie layer.
- Bake the brookiesPlace the pan in the oven and bake for 50 minutes, until the edges are golden and a toothpick inserted into the center comes out with a few moist crumbs. The top should look set and slightly crackly. Remove the pan from the oven and let it cool in the pan for at least 20 minutes before lifting out.Look for The edges are golden, the top is crackly, and the center is fudgy but set.Safe temperature 160°F (71°C) internal temperature (egg dishes)Tip Check at 45 minutes; ovens vary, and the center should be moist but not raw.
The cookie dough is pressed evenly across the bottom of the pan, and the brownie batter covers it completely.
After baking, the edges are golden, the top is crackly, and a toothpick inserted into the center comes out with moist crumbs. The kitchen smells of toasted butter and chocolate.
Cool and slice
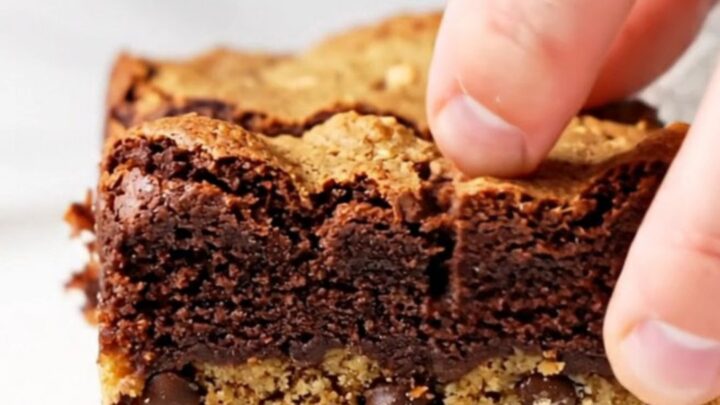
- Slice and serveLift the brookies out of the pan using the parchment overhang and transfer to a cutting board. Use a sharp knife to slice into 16 thick bars. Serve warm or at room temperature, with the gooey cookie bottom and fudgy brownie top in every bite.Look for The bars are thick, with distinct layers and a slight gooey center.Tip For clean slices, wipe the knife between cuts.
The brookies have cooled in the pan for at least 20 minutes and are firm enough to lift out. Slicing produces clean, thick bars with a visible cookie bottom and a fudgy brownie top. The texture is chewy at the base and dense, moist, and tender in the brownie layer.
Common mistakes
One common mistake is overmixing the batters, which can make the cookie layer tough and the brownie layer cakey. Mix just until the flour disappears. Another issue is underbaking the center; if the toothpick comes out with raw batter, return the pan to the oven for 5 more minutes.
Overbaking, on the other hand, dries out the brownie layer, so check early. Also, let the browned butter cool slightly before adding the eggs, or they will scramble.
How to tell it’s done
The brookies are done when the edges are golden brown and pull slightly away from the pan. The top should look set and crackly, and a toothpick inserted into the center should come out with a few moist crumbs, not wet batter.
The internal temperature of the egg-based batter should reach at least 160°F (71°C) to ensure the eggs are fully cooked. Let the bars cool in the pan for at least 20 minutes before slicing, as this helps the layers set and makes cutting easier.
- Egg dishes: 160°F (71°C) in the thickest part
Up next · Part 3 of 3
4 variations · storage & make-ahead · 5 answers · printable card
Tips, FAQ & printable recipe (Part 3)← Back to the ingredients (Part 1)