Desserts · Part 2 of 3: Instructions
Blueberry Earl Grey Honey Mascarpone Layer Cake with White Chocolate Step-by-step instructions
- Prep
- Cook
- Total
- Serves
- 12
Before you start
Gather every component before you start, because the cake comes together in stages and each part needs time to cool or chill. Set out the sponge layer, the acetate ring, the offset spatula, the microplane-style grater and a small saucepan. Measure the mascarpone, heavy cream, honey and sugar, and keep the mascarpone and cream cold until you need them.
Pick over the blueberries, reserving the best ones for the crown. Wash and dry the lemon, then zest and juice it. Prepare the cornstarch slurry, and have the confectioners' sugar and butterfly pea powder ready for the glaze. Clear a flat section of refrigerator space, because the assembled cake must chill between steps.
Ingredients at a glance (12)
- 1 round sponge cake layer, store-bought or made ahead
- 2 cups fresh blueberries, divided
- 1 lemon, for zest and juice
- 2 tsp loose Earl Grey tea leaves
- 16 oz mascarpone cheese, cold
- 1 cup heavy cream, cold
- 1/3 cup honey, plus more for the glaze
- 1/4 cup granulated sugar
- 1 tsp cornstarch mixed with 1 tbsp water
- 3 oz white chocolate, plus extra block for grating and pieces
- 1 cup confectioners' sugar
- 1/4 tsp butterfly pea flower powder, for a lavender tint
Instructions
Prepare the lemon and tea
- Prepare the lemon zest and teaSet the blueberries aside. Cut thin strips of peel from the lemon, avoiding the white pith, then pull them into curled zest with your fingers. Steep the loose Earl Grey leaves in the warm heavy cream for 10 minutes, then strain.Look for Lemon peel curls loosely and the cream turns light amber with a floral tea scent.Tip Keep the lemon peel thin so the zest tastes bright and not bitter.
- Make the blueberry compoteCombine 1 1/2 cups of the blueberries, the sugar, and the lemon juice in a small saucepan. Simmer over medium heat until the berries burst, about 8 minutes. Stir in the cornstarch slurry, cook 1 minute more, then cool completely.Look for The compote is deep purple, glossy and thick enough to coat a spoon.Tip Cool the compote fully so it does not melt the cream when spread.
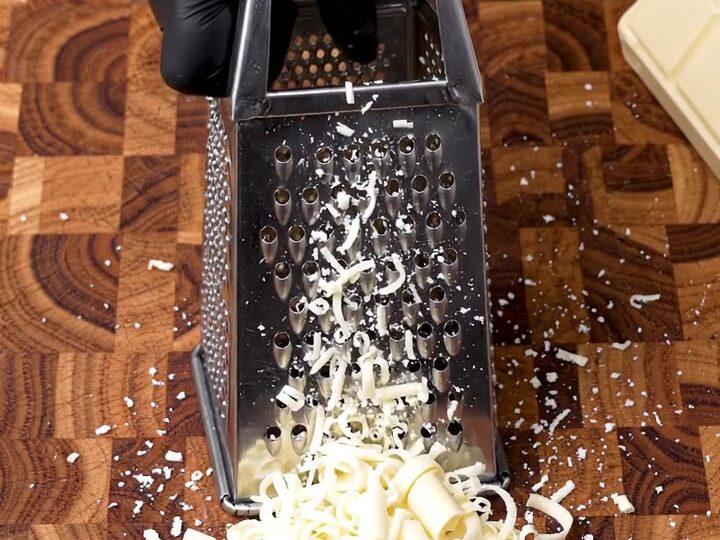
- Grate the white chocolateHold the block of white chocolate over the cutting board and grate it with a fine microplane-style grater. Collect the soft white curls and shavings, then chop a few pieces for the crown. Keep the curls cool until serving.Look for Soft white curls fall onto the board with a fine, feathery texture.Tip Chill the chocolate briefly if it softens too fast under the grater.
The lemon peel is cut into thin strips that curl gently, and the Earl Grey leaves have steeped in warm cream for about 10 minutes. The cream should look light amber and smell floral with a clean citrus note. Strain out the tea leaves completely before moving on, so the cream stays smooth and free of bits.
Check that the zest is fine and free of white pith, because bitter pith would carry through the whole cake. Cool the infused cream until it is cold before you whip it with the mascarpone, so the texture stays firm and the flavor stays bright throughout the layers.
Build the cream and compote
- Whip the honey mascarpone creamBeat the cold mascarpone with the honey until smooth. Add the tea-infused cream in a slow stream and whip to soft peaks, about 2 minutes. Keep the cream chilled until assembly.Look for The cream is pale, smooth and holds soft peaks on the beaters.Tip Do not overwhip, or the mascarpone will turn grainy.
- Assemble the first layerPlace the sponge layer inside the acetate ring on a board. Spread a thin, even coat of the mascarpone honey cream over the cake. Spoon the blueberry compote into the center and spread it outward with a spoon, leaving a border.Look for The compote forms a glossy purple layer that stays inside the cream border.Tip Leave a small border of cream so the compote stays centered.
- Add the cream layersSpread a second layer of cream over the fruit, smoothing it level with an offset spatula. Add the remaining cream over the top and sides so the layers are covered. Chill the cake in the ring until the cream is firm.Look for The cream surface looks smooth, pale and firm to a gentle touch.Tip Chill between layers for cleaner edges and sharper sides.
- Make the lavender glazeMelt the 3 oz white chocolate with 2 tablespoons of heavy cream, stirring until smooth. Whisk in the confectioners' sugar, a spoonful of honey and the butterfly pea powder for a lavender tint. Cool slightly until pourable.Look for The glaze is smooth, lavender-toned and pourable like warm syrup.Tip Cool the glaze to about 90°F before pouring so it clings to the cake.
The blueberry compote should be deep purple, glossy and thick enough to coat a spoon, with the berries broken down but still holding some shape. The honey mascarpone cream should be pale, smooth and hold soft peaks when the beaters are lifted. Check that the compote has cooled completely to room temperature before spreading, and that the cream has not gone grainy from overwhipping. Both components should be chilled until you are ready to assemble, which keeps the layers neat and prevents the cream from softening as you work.
Assemble, chill and glaze
- Glaze and finish the cakePour the glaze over the top of the chilled cake and let it run down the sides. Chill until the glaze sets, then crown the top with the remaining fresh blueberries, grated white chocolate curls and chopped white chocolate pieces.Look for The glaze sets glossy and the crown of berries and curls sits neatly on top.Tip Work quickly while the glaze is still warm to keep the drip even.
- Unmold and serveRemove the acetate ring carefully. Lift the cake onto a serving board with an offset spatula, keeping the layered interior visible. Slice with a warm knife and serve chilled.Look for The cake holds its shape, with a set glossy top and clean layers inside.Tip Dip the knife in hot water and wipe it dry between slices.
After each layer, the cream should look smooth, level and firm enough to hold its line when lightly touched. The compote layer should sit inside a thin border of cream, and no fruit should spill over the edge. Before glazing, the cake must be fully chilled and the glaze cooled to about 90°F so it pours smoothly and sets glossy. Once the glaze is on, it should run gently down the sides and stop at the base without pooling. Let it set in the refrigerator, then add the crown of berries, grated curls and chopped white chocolate so the finish looks neat and balanced.
Common mistakes
The most common problem is working with cream or compote that is too warm. Warm compote melts the mascarpone and blurs the layers, so cool it completely and chill the cream before spreading. Overwhipping the mascarpone is the second risk, because it turns grainy and loses its smooth, spreadable texture; stop as soon as it holds soft peaks.
Pouring glaze while it is too hot causes it to slide off the top and leave thin patches on the sides, so cool it until it is just warm to the touch. Skipping the chilling steps means the layers slide and the sides look uneven, so give each stage the full time it needs in the refrigerator. Finally, avoid pressing too hard with the offset spatula, which can drag the sponge and compote into the cream and make the layers look muddy.
How to tell it’s done
The cake is ready to glaze when the cream is firm enough to hold its shape at the sides and the top layer feels set to a light touch, with no soft spots or sliding. The compote should look glossy and stay in its layer when you cut into the cake. Because this cake contains no raw protein, there is no safe internal temperature to reach; the cake is ready for glazing once it has chilled and the cream feels firm.
The glaze is set when the surface looks smooth and glossy and no longer feels tacky when touched. A clean slice should show distinct layers of sponge, compote and cream, with the cream holding a neat edge. If the cream still feels soft, return the cake to the refrigerator for another 30 minutes before glazing or slicing.
Up next · Part 3 of 3
4 variations · storage & make-ahead · 5 answers · printable card
Tips, FAQ & printable recipe (Part 3)← Back to the ingredients (Part 1)