Drinks · Part 1 of 3: Ingredients
Blueberry Cashew Lassi Smoothie: Creamy, Thick and Ready in Minutes
- Prep
- Cook
- Total
- Serves
- 2
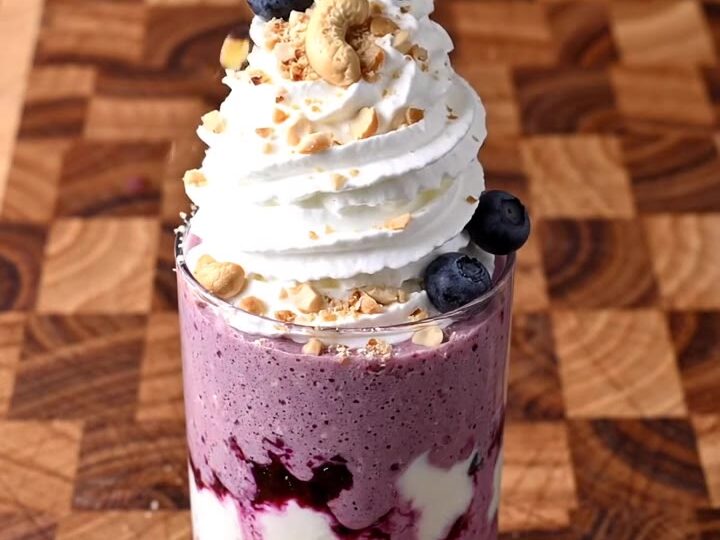
Picture a tall glass of deep purple lassi, thick enough to hold a spoon, with blueberries and creamy streaks showing through the sides.
This blueberry cashew smoothie comes together in one blender jug, and the finish of whipped cream turns a simple drink into something you will want to serve to guests. Everything you need is simple, and the method takes only minutes from start to finish.
This recipe takes the cool, creamy character of a classic yogurt-based lassi and gives it a fruity twist with fresh blueberries and ripe bananas. Ground cashews add body and a gentle nutty richness, while a little grated white cheese makes the texture thick and velvety. A pinch of cardamom brings warm, aromatic notes that pair beautifully with the berries.
The method is straightforward: prepare the fruit and nuts, grate the cheese, blend everything with ice until smooth, and finish the glass with a swirl of whipped cream. The result is a drink that feels indulgent but comes together with little more than a knife, a grater and a blender.
Ingredients
- 1 cup fresh blueberries, plus a few extra for layering
- 1 ripe yellow banana, sliced into rounds
- 1 peeled white banana, sliced into rounds
- 1/4 cup raw cashews, roughly chopped
- 2 oz block of white cheese, grated
- a pinch of ground cardamom, to taste
- 1 cup ice cubes
- canned whipped cream, for topping, to taste
Why this recipe works
The two bananas are the backbone of the texture. Ripe fruit breaks down quickly in the blender and releases natural sweetness and starch, which gives the smoothie its body without any added sugar. Using one yellow banana and one white banana adds both flavor and a smooth, uniform consistency, because the white banana is often slightly firmer and blends into a clean, pale base.
The cashews and grated white cheese work together to create a creamy, rounded mouthfeel. Chopped raw cashews break down into a silky emulsion when blended with liquid-free ingredients and ice, while the fine shreds of cheese melt into the mixture and add a subtle savory note that balances the fruit. Ice keeps the drink thick and cold so it stays spoonable in the glass.
Notes and substitutions
Choose ripe blueberries that are plump, dark and firm, and rinse them just before use so they stay dry and do not dilute the color. Frozen blueberries work well too and can replace some or all of the ice, which keeps the smoothie thicker.
Use raw cashews for the cleanest flavor, and chop them coarsely with a chef's knife so the blender can grind them smoothly without overheating.
A box grater with a fine side is the best tool for the white cheese, because it produces light, fluffy shreds that blend in quickly. A glass blender jug gives the most even results, and a sturdy base with enough power makes the difference between a grainy drink and a silky one.
For the finish, use a canned whipped cream dispenser with a star nozzle if you have one, since it creates a tall, neat peak over the glass.
- white cheese: paneer or a mild fresh farmer's cheese, grated
- raw cashews: roasted unsalted cashews or blanched almonds
- ground cardamom: a tiny pinch of ground nutmeg, or leave it out
Equipment
- Wooden end-grain cutting board
- Chef's knife
- Box grater
- Glass blender jug
- Tall glasses
- Canned whipped cream dispenser
Up next · Part 2 of 3
6 steps · 2 min of cooking · what to look for at each stage
Step-by-step instructions (Part 2)