Drinks · Part 2 of 3: Instructions
Blue Cloud Pineapple Coconut Smoothie with Spirulina and Whipped Cream Step-by-step instructions
- Prep
- Cook
- Total
- Serves
- 2
Before you start
Gather all the ingredients and equipment before you start, so the blending moves quickly and the smoothie stays cold. Chill the glasses in the freezer for about 10 minutes. Cut the pineapple into chunks and set aside a wedge for garnish. Slice the banana into rounds, and cut the coconut meat into small pieces. Open the can of coconut milk and shake it well before measuring.
Whip the heavy cream to soft peaks and keep it chilled in the refrigerator until you pipe it. Measure the spirulina powder carefully, since a small amount produces a strong color. Have the ice ready so it goes straight into the blender jar. Keep the fruit in the refrigerator until the moment you blend, and do not leave the prepared smoothie sitting on the counter, because it warms and loses its frosty texture quickly.
Ingredients at a glance (9)
- 1 cup fresh pineapple, cut into chunks, plus a wedge for garnish
- 1 ripe banana, sliced into rounds
- 1/2 cup fresh coconut meat, cut into pieces
- 1/4 cup fresh coconut, finely grated
- 1 cup ice cubes
- 1/2 cup coconut milk
- 1/2 tsp blue-green spirulina powder
- 1/2 cup heavy cream, whipped to soft peaks
- fresh coconut curls and grated coconut, for garnish, to taste
Instructions
Fruit and coconut prepared
- Prepare the fruit and coconutSet a wooden cutting board and put on gloves if you like. Cut the fresh pineapple into chunks and rounds, slice the ripe banana into rounds, and cut the coconut meat into pieces. Set a wedge of pineapple aside for garnish.Look for Pineapple chunks are firm, banana rounds are even, and coconut pieces are clean and white.Tip Chill the fruit for 15 minutes before blending for a thicker, colder smoothie.
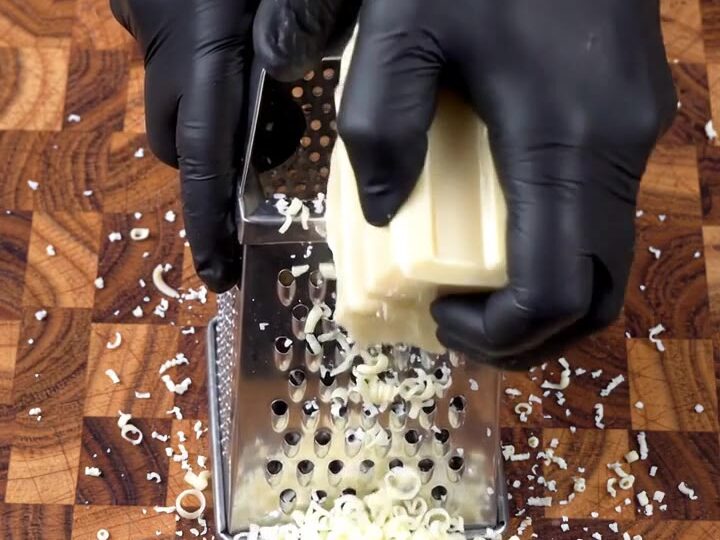
- Grate the fresh coconutHold a block of fresh coconut against a box grater and grate it over the cutting board. The fine white shavings will fall onto the board. Reserve about 1/4 cup for the blender and the rest for the garnish.Look for Fine white shavings collect on the board, light and fluffy.Tip Grate on the small holes for fine shavings that blend easily.
The pineapple chunks, banana rounds and coconut pieces are cut and ready on the board, and a pineapple wedge is set aside for garnish. Fresh coconut has been grated into fine white shavings, with about a quarter cup reserved for the blender.
Everything looks clean and evenly cut, which helps the blender work efficiently and gives a smooth texture. Before going on, check that the fruit is cold and that the coconut shavings are fine and dry, not clumped. If the fruit feels warm, return it to the refrigerator for 15 minutes so the blended drink stays frosty.
Smoothie blended smooth
- Blend the smoothieAdd the pineapple, banana, coconut meat, grated coconut, ice cubes, coconut milk and spirulina powder to a glass blender jar. Secure the lid and blend until smooth and an even turquoise color.Look for The mixture is smooth with no visible chunks and a uniform blue-green color.Tip Blend in short bursts first, then run the blender on high to crush the ice.
- Pour and top the glassPour the smoothie into a crystal-cut glass. Pipe a generous swirl of whipped cream on top through a piping bag fitted with a star tip.Look for The smoothie is frosty and the cream holds a clean swirl on top.Tip Chill the glass in the freezer for 10 minutes for a frostier finish.
The blender has run until the mixture is completely smooth, with no visible chunks of pineapple or coconut and no ice flecks left. The color is a uniform turquoise, the same across the whole jar, which shows the spirulina has been fully incorporated. The smoothie should look thick and frosty and pour slowly from the jar. Before going on, stop the blender and look at the surface; if you see streaks of green or specks of fruit, blend for another 10 to 15 seconds until the texture and color are even throughout.
Glass topped and garnished
- Garnish and serveFinish the rim with fresh coconut curls and grated coconut. Tuck a wedge of pineapple onto the side of the glass and serve the smoothie right away.Look for Coconut curls rest on the rim and the pineapple wedge sits on the side of the glass.Tip Serve with a short straw and a long spoon for the cream.
The smoothie is poured into a chilled crystal-cut glass, and a generous swirl of whipped cream sits neatly on top without spreading into the drink. The rim is finished with fresh coconut curls and grated coconut, and a pineapple wedge rests on the side. The glass should feel cold to the touch and the cream should hold its shape. Before serving, check that the garnishes are firmly in place and that the cream has not softened, because a stable topping keeps the presentation sharp until the first sip is taken.
Common mistakes
The most common mistake is blending too long with warm fruit, which melts the ice and produces a thin, watery smoothie instead of a frosty one. Chill the fruit and the glasses beforehand and blend just until smooth. Another frequent error is adding too much spirulina.
Only half a teaspoon is needed for a vivid blue-green, and extra powder can taste grassy and make the color murky rather than bright. Measure it carefully and add more only if the color is too pale. Whipped cream can also deflate if it sits out too long, so pipe it just before serving. Finally, avoid grating coconut onto a warm board, because the shavings clump and lose their fine texture.
How to tell it’s done
The smoothie is ready when it is completely smooth, with no visible chunks of fruit, coconut or ice, and has an even turquoise color from top to bottom. It should look thick and frosty, pour slowly from the blender jar, and hold a thin layer of foam on the surface.
Run the blender a few seconds longer if you see streaks or specks. There is no cooking temperature in this recipe, so the test is texture and color. When the smoothie is poured, the whipped cream should hold a clean swirl on top, and the coconut curls should sit firmly on the rim without sliding off the glass.
Up next · Part 3 of 3
4 variations · storage & make-ahead · 5 answers · printable card
Tips, FAQ & printable recipe (Part 3)← Back to the ingredients (Part 1)