Desserts · Part 2 of 3: Instructions
Blonde Chocolate Crunch Bars with Cookie Butter and Pecans Step-by-step instructions
- Prep
- Cook
- Total
- Serves
- 12
Before you start
Gather all the ingredients and equipment before you start, because the chocolate needs to be worked while it is still soft. Chill the block of blonde chocolate in the refrigerator for at least 20 minutes so it grates into clean curls rather than smearing on the box grater. Line the rectangular metal baking tray with parchment paper, letting it overhang the edges slightly so the finished slab can be lifted out easily.
Set a large sharp knife and a wooden end-grain cutting board within reach, and have a small bowl ready for the chopped crunch. Measure the cookie butter spread and the pecans, and keep the biscuits in their package until you are ready to chop. Keep a spatula and a small saucepan or microwave-safe bowl nearby for melting the chocolate.
Ingredients at a glance (4)
- 12 oz blonde chocolate, in one block, chilled
- 6 oz cookie butter biscuits, such as Biscoff cookies
- 1/2 cup pecans, roughly chopped
- 1/3 cup cookie butter spread, for swirling
Instructions
Chop and grate the base
- Chop the biscuit and nut crunchStack the cookie butter biscuits and pecans on a wooden end-grain cutting board. Chop them with a large knife until they form a coarse, mixed crunch with some larger pieces of biscuit and nut still visible. Set the crunch aside in a bowl.Look for Coarse, mixed pieces with pecan chunks and biscuit crumbs, no fine dust.Tip Rock the knife in a steady motion to keep the pieces even and avoid pulverising them.
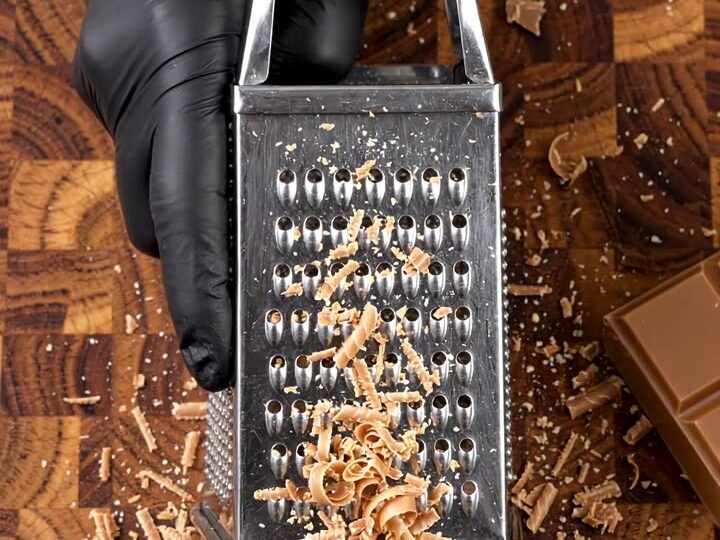
- Grate the blonde chocolateHold the chilled block of blonde chocolate against the coarse side of a box grater, directly over the board. Grate the chocolate until fine curled shavings fall onto the board, then gather the shavings into a small pile.Look for Fine, curled shavings collecting on the board, with no large chunks left.Tip Chill the block well before grating so it shaves cleanly and does not smear on the grater.
At the end of this phase you should have a bowl of coarse, mixed biscuit and pecan crunch and a small pile of fine blonde chocolate shavings on the board. The crunch should show clear pieces of biscuit and nut, with no dust or powder left behind. The shavings should be light, curled and separate, not clumped or smeared. Check that the chocolate is still cool to the touch and that no large chunks remain on the grater. Set both components beside the baking tray so you can work straight through the next phase without pausing. If the shavings have softened in your hands, return them to the refrigerator for a few minutes before melting.
Melt, swirl and scatter
- Melt and spread the baseMelt the grated blonde chocolate gently, stirring until smooth and glossy, either in a small saucepan over low heat or in a microwave-safe bowl in short bursts. Line a rectangular metal baking tray with parchment paper, pour in the melted chocolate and spread it evenly with a spatula to the edges.Look for Smooth, glossy and pourable, with no grainy streaks.Tip Keep the heat low and stop heating as soon as it looks almost melted, then stir to finish.
- Swirl cookie butter on topWarm the cookie butter spread for a few seconds so it loosens. Drizzle it over the surface of the chocolate and drag a knife or the tip of a spatula through it in loose, decorative swirls. Keep the swirls spread across the whole tray.Look for Pale golden swirls visible across the chocolate surface.Tip Work quickly while the chocolate is still soft so the swirls stay defined.
- Scatter the crunchSprinkle the chopped biscuit and pecan crunch evenly over the swirled chocolate. Press the pieces very lightly with your fingertips so they stick into the surface without sinking out of sight.Look for Biscuit and pecan pieces evenly distributed and lightly anchored.Tip Press gently, then stop, so the crunch stays visible on the finished slab.
At the end of this phase the melted blonde chocolate should be smooth, glossy and spread evenly across the parchment-lined tray, with no grainy streaks or thick patches. The cookie butter should show as pale golden swirls over the surface, and the chopped biscuit and pecan crunch should be scattered across the whole tray at an even density.
Gently press the pieces so they anchor into the soft chocolate without sinking out of sight. Look for an even edge all the way around the tray. If the chocolate has started to stiffen before you finish spreading, warm it very briefly and stir before continuing, so the final surface stays smooth and the swirls remain defined.
Set and cut the slab
- Set the slab until firmLeave the tray at cool room temperature or in the refrigerator until the chocolate is completely firm and no longer tacky when touched. This usually takes about one hour in the refrigerator.Look for Firm surface that does not dent under a light touch and no longer feels soft.Tip Refrigerate for the fastest set, and keep the tray flat so the slab sets evenly.
- Cut the slab into two barsLift the set slab out of the tray using the parchment. Set it on the board and cut straight down the middle with a sharp knife to make two long pieces. Then cut each long piece into smaller bars across its width.Look for Clean, straight cut edges showing biscuit and pecan pieces.Tip Wipe the knife between cuts and use a single firm pass to keep the edges neat.
At the end of this phase the slab should be completely firm, with a surface that does not dent or feel tacky under a light touch. It should look thick, smooth and pale golden-brown, with the biscuit and pecan pieces clearly visible in the surface. Lift the slab out using the parchment, set it on the board and check that it releases cleanly from the tray without cracking. The cut edges should be straight and clean, showing the crunch inside each bar. If the slab still feels soft in the centre, return it to the refrigerator for another 15 minutes before cutting, since a warm slab smears and tears.
Common mistakes
The most common mistake is overheating the blonde chocolate. It can seize, turn grainy or scorch if it is melted too fast or at too high a temperature, so keep the heat low and stop as soon as the chocolate is nearly melted, then stir to finish. A second mistake is spreading the chocolate unevenly, which leaves thin, brittle areas and thick, slow-setting ones.
Use the spatula to push the chocolate to the edges in one smooth motion. Adding the cookie butter when the base has already set will also cause the swirls to crack and lift, so work while the chocolate is still soft. Finally, do not cut the slab before it is firm. A warm or soft slab drags and tears, which ruins the clean line you want down the middle.
How to tell it’s done
The bars are done when the chocolate base is completely set. Press a fingertip lightly on the surface and check that it does not dent, feel sticky or leave a print. The slab should lift cleanly from the parchment, and when you cut it the edges should be sharp and show the biscuit and pecan pieces without crumbling.
The chocolate should look smooth and pale golden-brown, with the cookie butter swirls still visible. Because this recipe contains no protein that needs cooking, there is no internal temperature to reach. Blonde chocolate sets at cool temperatures, so the firm texture and clean cut are the reliable signs that the slab is ready to portion.
Up next · Part 3 of 3
4 variations · storage & make-ahead · 5 answers · printable card
Tips, FAQ & printable recipe (Part 3)← Back to the ingredients (Part 1)