Desserts · Part 2 of 3: Instructions
Black Forest Chocolate Cherry Almond Bark in 30 Minutes Step-by-step instructions
- Prep
- Cook
- Total
- Serves
- 12
Before you start
Gather everything before you start, because the chocolate sets quickly once it goes on the tray. Line a rimmed baking tray with parchment paper so it covers the bottom and hangs slightly over the edges. Set out a wooden cutting board, a sharp chef's knife, a box grater and a microwave-safe bowl or a small saucepan for a double boiler.
Measure the whole almonds and dried cherries, dividing the cherries into two portions for the base and the topping. Break the dark chocolate into rough pieces, setting aside a small portion to grate. Chill that portion for about 10 minutes so it grates into clean curls. Keep the tray close to the board so you can move the bark to a cool spot without a rush.
Ingredients at a glance (3)
- 1 cup whole almonds, roughly chopped
- 3/4 cup dried cherries, divided
- 12 oz dark chocolate, divided, plus extra for grating
Instructions
Base layer and grated chocolate
- Chop the almonds and cherriesLine a rimmed baking tray with parchment paper. On a wooden cutting board, chop the whole almonds into rough pieces with a chef's knife. Chop the dried cherries into smaller pieces too, then set both aside in separate piles.Look for Almond pieces should range from small slivers to coarse chunks, with no whole nuts left.Tip Chop on a board you can wipe clean, and keep the cherries from sticking to the blade by rinsing the knife now and then.
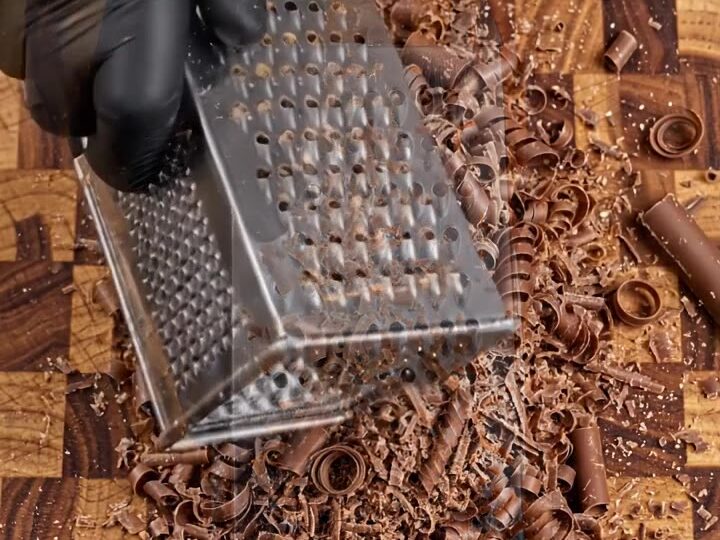
- Grate the chocolateSet a box grater over the cutting board. Grate about 3 oz of the dark chocolate across the large holes so fine curls and shavings fall onto the board. Keep these grated curls separate for the topping.Look for Fine curls and shavings should drop onto the board, not clump together.Tip Chill the chocolate for 10 minutes first; it grates more cleanly when it is firm.
The almonds and cherries should lie in an even layer across the parchment, with no bare corners. The grated chocolate should look like fine curls and shavings lying on the board, not clumped into balls. Check that the nuts are chopped into a mix of small and coarse pieces, with no whole almonds left.
The board should be clear of loose pieces that might end up on the tray. When these are in place, you can melt the chocolate without rushing, because the base is ready to receive it and nothing will need rearranging once the glossy layer is spread on top.
Melted chocolate and toppings
- Scatter the base layerSpread about half of the chopped almonds and cherries evenly across the parchment-lined tray. Leave a small gap at the edges so the mixture settles into a level layer.Look for The almonds and cherries should cover the tray in one even layer.Tip Use your fingers to spread the pieces so none gather in one corner.
- Melt and spread the chocolateMelt the remaining dark chocolate in a microwave-safe bowl, heating in 30-second bursts and stirring until smooth. Pour it over the scattered almonds and cherries, then spread it into a thick, even layer with an offset spatula.Look for The melted chocolate should look smooth and glossy with no lumps.Tip Stir between bursts; chocolate holds its shape even when it looks melted.
- Top and press the toppingsScatter the remaining cherries, almond pieces and grated chocolate over the melted layer. Press them gently into the surface by hand until the top is evenly covered.Look for No bare patches of chocolate should remain on the surface.Tip Press lightly with your palm so the toppings stick without breaking the chocolate layer.
The melted chocolate should look smooth, glossy and free of lumps, and it should spread easily under the spatula into a thick, even layer. Scatter the remaining cherries, almond pieces and grated chocolate across the surface, then press them in lightly with your palm.
Look for a surface with no bare patches of chocolate and toppings that sit firmly in place rather than sliding off. The chocolate should still be soft enough to take the toppings, so work promptly. If the chocolate starts to thicken before the toppings are placed, gently reheat it in 10-second bursts.
Setting and breaking the bark
- Let the bark setLeave the tray at cool room temperature until the chocolate is completely firm, about 1 hour. Do not refrigerate it, as that can cause the chocolate to bloom with white streaks.Look for The surface should feel firm and no longer tacky when lightly touched.Tip A cool kitchen counter is the best place for the bark to set glossy.
- Cut and break the barkLift the parchment and the set bark onto the board. Cut it into rectangular pieces with a chef's knife, then break the slab apart by hand into rustic shards.Look for The bark should snap cleanly along the lines, showing red cherries and almond pieces.Tip Cut into rectangles first, then break along the lines for neat, even shards.
After about an hour at cool room temperature, the surface should feel firm and no longer tacky when touched lightly. The slab should look dark and glossy, with red cherries and almond pieces visible throughout. Cut it into rectangles and break along the lines; the pieces should snap cleanly without crumbling into dust. If the chocolate still feels soft in the center, leave it for another 15 minutes before cutting. Avoid refrigerating the bark to speed up setting, because sudden temperature changes can cause white streaks on the surface.
Common mistakes
The most common problem is overheating the chocolate. Melt it in short bursts and stir between each one, because dark chocolate can seize and turn grainy if it gets too hot. Chilling the bark in the refrigerator is another mistake: it can cause the chocolate to bloom with a dull, white film, and the bark may then taste waxy.
Chopping the cherries too finely makes them disappear into the chocolate, so keep some pieces larger for visible color. Finally, skipping the first layer of nuts and cherries means the toppings may slide off when you break the slab. Spread the base first and press the topping in while the chocolate is still soft.
How to tell it’s done
Bark is done when the chocolate has set firm and no longer feels tacky or soft when touched lightly. The surface should look glossy and even, with the toppings held firmly in place. When you cut the slab, the pieces should snap cleanly along the lines, and the chocolate should break with a crisp edge rather than bend or smear. Because this recipe has no meat, poultry, fish or eggs, there is no safe internal temperature to reach. Cool room temperature is the right setting environment, and the bark is ready when it feels firm all the way through.
Up next · Part 3 of 3
4 variations · storage & make-ahead · 5 answers · printable card
Tips, FAQ & printable recipe (Part 3)← Back to the ingredients (Part 1)