Desserts · Part 2 of 3: Instructions
Better Than Sex Cake with Caramel and Toffee in One Dish Step-by-step instructions
- Prep
- Cook
- Total
- Serves
- 12
Before you start
Take the whipped topping out of the freezer and set it in the refrigerator to thaw — it needs several hours, so plan this the night before or first thing in the morning. Have the chocolate cake ready in its 9x13-inch glass dish, fully cooled; if it was baked ahead the same day, give it at least an hour on a wire rack.
If the caramel sauce has thickened in the refrigerator, let the jar sit at room temperature while you set up, or warm it briefly before pouring. Set the wooden spoon handle or skewer, the offset spatula, and the wire rack on the counter so nothing is improvised mid-recipe, and clear a flat spot in the refrigerator for the dish to chill.
Ingredients at a glance (4)
- 1 chocolate cake (9x13-inch), store-bought or made ahead
- 1 cup caramel sauce, thick and pourable
- 8 oz frozen whipped topping, thawed
- 1 cup toffee bits, chopped
Instructions
Poke the cooled cake
- Set up the cooled cakeUnmold nothing: keep the chocolate cake right in its 9x13-inch glass baking dish. Set the dish on a wire rack and let the cake come to cool room temperature, or use one baked earlier in the day and chilled. The crumb should feel firm and cool so the holes hold their shape cleanly.Look for The surface feels cool to a light fingertip press and the edges sit slightly away from the glass.Tip A fully cooled cake pokes cleanly; a warm one tears and the holes collapse shut again.
- Poke holes across the surfaceUsing the handle of a wooden spoon or a skewer, poke holes all over the cake, about 1 inch apart, pressing down three-quarters of the way through the crumb. Work in even rows so every future square gets the same share of caramel channels beneath it.Look for The holes glisten slightly and hold their shape without crumbling the surrounding crumb.Tip Twist the spoon handle gently as you pull it out so the holes stay open for the caramel.
The cooled cake sits level in its glass dish, and the poked surface shows even rows of holes about an inch apart, each one holding its shape with clean edges and no torn crumb around it.
The cake should feel cool through to the center before any caramel arrives — press gently with a fingertip to confirm. If the holes collapse or the crumb smears, the cake is still too warm; give it more time on the rack before moving on to the soak.
Soak with caramel and chill
- Warm the caramel sauceStir the caramel sauce until it pours in a smooth ribbon. If it has thickened, warm it for about ten seconds so it flows freely but still clings to a spoon. Thick caramel is the goal here, since a thin topping would run straight through the holes and out of the slice.Look for The caramel falls from the spoon in a slow, glossy ribbon that holds its shape for a second.Tip Slightly warm caramel soaks deeper; overheated caramel turns runny and thins the soak.
- Pour the caramel into the holesDrizzle the caramel slowly over the entire surface, aiming into the holes. Work in three passes, moving in different directions each time, so the caramel soaks in evenly instead of pooling in one spot. Let the cake sit for a few minutes while the first wave absorbs.Look for The surface looks glossy and damp everywhere, with no dry pale patches of cake left visible.Tip Aim the spoon directly over each row of holes so the channels fill from the bottom up.
- Chill until fully setCover the dish and refrigerate for at least 1 hour so the caramel sets into the crumb and the cake firms up enough to hold the topping. The cake should feel cool to the touch in the center before the next phase begins, with no free caramel flowing at the edges.Look for When pressed lightly, the surface feels cool and the caramel no longer looks wet beneath the holes.Tip Do not skip the chill; a warm cake melts the whipped topping into a puddle instead of a fluffy layer.
The poked surface glistens with caramel everywhere, no pale dry patches left, and the sauce has sunk into the holes rather than pooling on top. After at least an hour in the refrigerator, the cake feels cool through to the center and the caramel looks set beneath the surface. Press gently with a fingertip: the crumb should feel moist and dense, not wet, and the dish should show no free-flowing caramel around the edges.
Top, sprinkle, and serve
- Spread the whipped toppingSpread the thawed whipped topping over the chilled cake with an offset spatula, working from the center outward in gentle strokes. Build an even, billowy layer all the way to the edges, sealing the caramel layer beneath it so no soaked crumb shows through.Look for The topping holds soft peaks and covers every inch of caramel with no cake showing through.Tip Keep the whipped topping cold until the last moment; it spreads cleanest straight from the refrigerator.
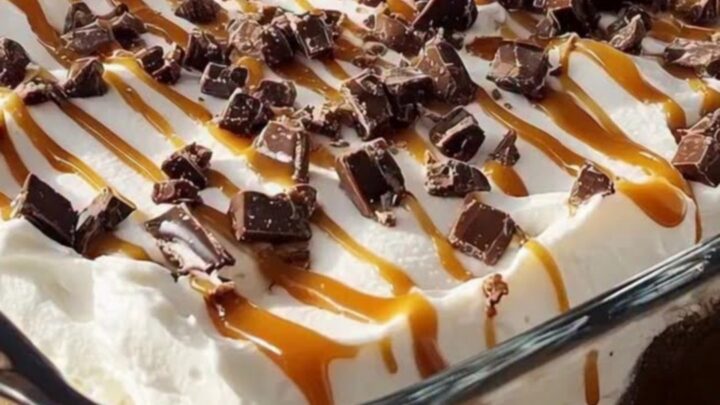
- Finish with toffee bitsScatter the chopped toffee bits evenly over the whipped topping, letting a few tumble down the sides of the cake just as the finished dessert is presented. Press them in very lightly so they adhere without sinking into the creamy layer beneath.Look for The toffee sits crisp and distinct on the surface, with a few pieces resting against the glass edges.Tip Add the toffee just before serving so the pieces stay crisp against the creamy topping.
- Slice and serve coldSlice the cake into 12 even squares with a sharp knife wiped clean between cuts, and lift each piece with a narrow spatula so the layers stay defined. Serve cold, straight from the glass baking dish, with a fork — the way the finished cake is shown at its best.Look for Each square shows three layers: dark cake, golden caramel, and a snowy topping flecked with toffee.Tip Chill dessert plates for ten minutes if serving takes a while, so the topping holds its shape.
The whipped topping covers the cake in an even, billowy layer with soft peaks and no caramel peeking through, and the toffee bits sit crisp and distinct on the surface. Squares lift cleanly from the glass dish and hold their three layers when cut. Serve straight from the dish, cold; if the topping starts to soften on a warm day, return the cake to the refrigerator between servings.
Common mistakes
The most common slip is pouring caramel onto a cake that is still warm: the topping melts and the caramel runs thin, so respect the full hour of chilling before the topping goes on. Holes that are too shallow hold little caramel, while holes drilled clear to the bottom let it escape — press the spoon handle three-quarters of the way down.
Dumping all the caramel in one spot creates a soaked puddle next to dry cake; three even passes fix that. Finally, do not add the toffee bits early: against the moist topping they soften within the hour.
How to tell it’s done
The soaked cake is ready for topping when the surface feels cool and the caramel no longer looks wet in the holes. The finished dessert is at its best cold: the topping holds its billowy shape, the toffee bits are crisp, and each square cuts into three distinct layers — dark crumb, golden caramel, and white topping.
If the caramel seeps out the sides when sliced, chill another 30 minutes before serving. Nothing here is served warm; the cold state is the finished one.
Up next · Part 3 of 3
4 variations · storage & make-ahead · 5 answers · printable card
Tips, FAQ & printable recipe (Part 3)← Back to the ingredients (Part 1)