Dinner · Part 2 of 3: Instructions
Baked Stuffed Eggplant Cups with Spiced Beef Step-by-step instructions
- Prep
- Cook
- Total
- Serves
- 4
Before you start
Before starting, gather all the ingredients and equipment. Cut the eggplants into cylinders and hollow them out. Finely dice the onion, peppers, and garlic. Slice the cherry tomatoes and prepare the pepper rings. Whisk the hot water and tomato paste for the broth.
Have the baking dish and parchment paper ready. Preheat the oven to 400°F (200°C) when you begin the filling step. This recipe moves quickly once you start cooking, so having everything prepped and measured will make the process smooth and enjoyable.
Ingredients at a glance (14)
- 4 medium eggplants
- 1/4 cup olive oil, for frying
- 400 g ground beef
- 1 onion, diced
- 1 red kapya pepper, diced
- 2 green peppers, diced
- 2 cloves garlic, minced
- 1 tbsp tomato paste
- 1 tsp salt
- 1 tsp ground cumin
- 8 cherry tomatoes, sliced
- 8 green pepper rings
- 1 1/2 cups hot water
- 1 tbsp tomato paste
Instructions
Prepare and Fry
- Prepare the Eggplant CupsCut the stems off the eggplants and slice each crosswise into 3-inch cylinders. Use a small spoon to hollow out the center of each cylinder, leaving a 1/2-inch wall and a bottom, to create a cup. Reserve the scooped-out flesh for another use or discard. Heat the olive oil in a large skillet over medium-high heat. Fry the eggplant cups in batches until lightly golden on all sides, about 2 minutes per side. Transfer to a plate lined with paper towels.Look for The eggplant cups are lightly browned but still hold their shape.Tip Don't over-fry; the eggplant will finish cooking in the oven.
- Brown the Beef FillingIn the same skillet, add the ground beef and cook over medium-high heat, breaking it up with a spoon, until browned, about 5 minutes. Add the diced onion, red kapya pepper, green peppers, and minced garlic. Cook, stirring, until the vegetables are softened, about 3 minutes. Stir in the tomato paste, salt, and cumin. Cook for 1 minute more, until fragrant.Look for The beef is browned and the vegetables are tender.Safe temperature 160°F (71°C) internal temperature (ground meat)Tip If the skillet seems dry, add a splash of water to help the vegetables soften.
The eggplant cups are lightly golden and hold their shape. The beef filling is browned and fragrant with cumin and garlic. The kitchen smells of sizzling beef and sweet peppers.
The eggplant cups are ready to be filled, and the filling is moist and well-seasoned. If the filling seems dry, add a splash of water or broth. The cups should be arranged in the baking dish in a single layer, snugly but not overcrowded.
Fill and Bake
- Fill the Eggplant CupsPreheat the oven to 400°F (200°C). Arrange the fried eggplant cups upright in a rectangular baking dish. Spoon the beef filling into each cup, mounding it slightly. Top each cup with a slice of cherry tomato and a green pepper ring.Look for The cups are filled to overflowing.Tip Pack the filling gently, but don't press too hard or the eggplant may tear.
- Make the Tomato BrothIn a small bowl, whisk together the hot water and tomato paste until smooth. Pour the broth carefully around the base of the eggplant cups, not over the tops. Cover the dish with a sheet of wet parchment paper, tucking it around the edges.Look for The broth reaches about halfway up the sides of the cups.Tip Wet the parchment under the tap and shake off excess before covering.
- Bake the Stuffed EggplantsPlace the dish in the preheated oven and bake for 30 minutes, until the eggplant is tender and the tops are golden. Remove the parchment paper for the last 5 minutes of baking to allow the tops to brown further.Look for The eggplant is easily pierced with a fork and the tops are lightly browned.Tip If the broth reduces too much, add a splash of hot water.
The cups are filled to overflowing, topped with cherry tomato slices and pepper rings. The tomato broth is poured around the base, and the dish is covered with wet parchment. The oven is preheated and the dish is baking. The aroma of roasting eggplant and spiced beef fills the kitchen. The broth is bubbling gently, and the eggplant is turning tender. The cups are golden and the filling is heated through.
Serve and Enjoy
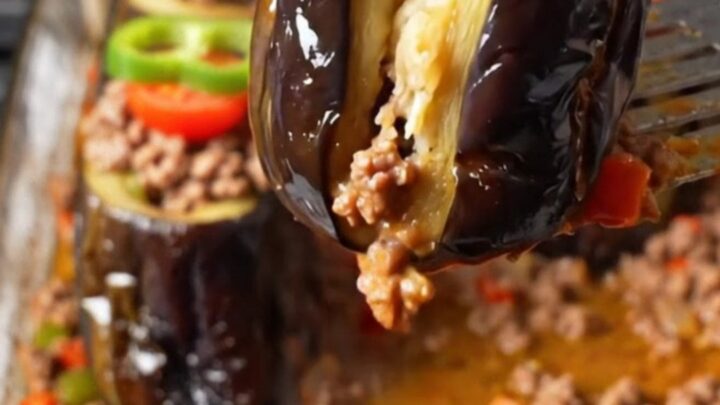
- Serve the Eggplant CupsCarefully lift the eggplant cups out of the baking dish with a spatula, letting the excess broth drip back. Place them on a serving platter or individual plates. Spoon some of the pan sauce over the top. Serve hot.Look for The cups are glossy and the filling is steaming.Tip The sauce is delicious spooned over rice or with crusty bread.
The eggplant cups are lifted out of the baking dish, glossy and steaming. The pan sauce is spooned over the top. The filling is juicy and the eggplant is silky. The first bite reveals a perfect balance of flavors: sweet roasted eggplant, savory spiced beef, and tangy tomato broth. The dish is ready to be served immediately, with extra sauce on the side.
Common mistakes
One common mistake is over-frying the eggplant, which can make it greasy. Fry just until lightly golden, about 2 minutes per side. Another is under-seasoning the filling; taste it before filling the cups and adjust the salt and cumin as needed.
Avoid overfilling the cups to the point that the filling spills out and burns on the baking dish. Also, be careful when pouring the broth not to wash the toppings off the cups. If the parchment paper is not wet, it may burn in the oven, so be sure to dampen it thoroughly.
How to tell it’s done
The eggplant cups are done when the eggplant is tender and easily pierced with a fork, and the tops are golden brown. The filling should be hot and the internal temperature of the beef should reach 160°F (71°C) as measured with an instant-read thermometer.
The broth should be bubbling and slightly reduced. If the eggplant is not yet tender after 30 minutes, cover the dish again and bake for an additional 5 to 10 minutes. Let the dish rest for a few minutes before serving to allow the flavors to settle.
- Ground meat: 160°F (71°C) in the thickest part
Up next · Part 3 of 3
4 variations · storage & make-ahead · 5 answers · printable card
Tips, FAQ & printable recipe (Part 3)← Back to the ingredients (Part 1)