Dinner · Part 2 of 3: Instructions
Baked Enchilada-Style Beef Burritos for a Quick Crowd Dinner Step-by-step instructions
- Prep
- Cook
- Total
- Serves
- 6
Before you start
Heat the oven to 375°F (190°C) with a rack in the upper third, and set out the 9x13 baking dish so assembly moves without a pause. Shred the cheddar-jack if starting from a block, open and drain the black beans, and fluff the cooked Mexican rice so it is loose and scoopable.
Have the enchilada sauce measured and the toppings prepped: dice the tomatoes, slice the scallions and jalapeños, and set the sour cream in a small bowl. The beef browns fastest in a wide skillet, so put that on the stove before anything else.
Ingredients at a glance (12)
- 1 1/2 lb ground beef (85% lean)
- 2 tbsp taco seasoning
- 1/4 cup water
- 1 1/2 cups cooked Mexican rice, store-bought or made ahead
- 1 can (15 oz) black beans, drained and rinsed
- 6 large flour tortillas
- 2 cups red enchilada sauce
- 2 1/2 cups shredded cheddar-jack cheese
- Sour cream, for serving
- Diced tomatoes, for serving
- scallions, sliced, for serving
- jalapeños, sliced, for serving
Instructions
Build the filling
- Brown the taco beefSet a large skillet over medium-high heat and add the ground beef, breaking it into small crumbles with a wooden spoon. Sprinkle the taco seasoning over the meat and keep stirring until no pink remains. Cook until the beef reaches an internal temperature of 160°F (71°C), about 6 to 8 minutes.Look for The crumbles look deeply browned, the fat has rendered clear, and no trace of pink shows anywhere in the pan.Safe temperature 160°F (71°C) internal temperature (ground meat)Tip Break the meat into pea-sized crumbles so every burrito gets beef in every bite without bulky chunks.
- Make the saucy fillingPour the water into the skillet and stir, scraping up the browned bits from the bottom so the seasoning dissolves into a light sauce. Simmer for 1 to 2 minutes until the pan looks nearly dry, then remove it from the heat. Taste a small spoonful and add a pinch more taco seasoning only if needed.Look for The beef glistens with a light coating of sauce instead of swimming in liquid, and the pan bottom is nearly clean.Tip A nearly dry filling keeps the tortillas from turning soggy while the burritos bake.
- Prep the rice and beansFluff the cooked Mexican rice with a fork so no clumps remain, and drain and rinse the black beans in a colander. Stir the beans into the beef in the skillet, then transfer the beef mixture and the rice to a mixing bowl if the skillet feels crowded. Keep both components warm while the tortillas are warmed.Look for The rice grains separate cleanly, and the beans look intact and glossy, not mushy or broken.Tip Pat the rinsed beans dry with a paper towel so no extra water seeps into the tortillas.
At the end of this phase the work is all done in the skillet and the bowl, and nothing has gone near the baking dish yet. The beef should be browned in small, even crumbles with no pink anywhere, cooked through to 160°F (71°C), and nearly dry in the pan with just a glossy coating of seasoned sauce. The rice should be fluffy and separate, the beans intact and rinsed, and the two folded into the beef so the filling looks cohesive rather than three separate piles.
Roll, sauce, and bake
- Warm the tortillasWrap the flour tortillas in a damp paper towel and microwave them for 30 to 45 seconds, or warm them one at a time in a dry skillet over medium heat for about 20 seconds per side. Warm tortillas bend without cracking, which makes tight rolling possible. Keep them covered until each one is filled.Look for A tortilla folds over your hand in a smooth curve with no white cracks along the bend.Tip Stack warmed tortillas under a clean towel so steam keeps them pliable while rolling.
- Fill and roll the burritosLay a warm tortilla flat and spoon about 1/4 cup of rice, a generous 1/3 cup of the beef and bean mixture, and a little more rice down the center, leaving the edges free. Fold in the two sides, then roll tightly into a log. Place each burrito seam-side down in the 9x13 baking dish, snugging them together.Look for Each burrito holds a firm cylinder shape with the seam tucked underneath and no filling escaping at the ends.Tip Six burritos fit snugly in one layer, which helps them hold their shape as they bake.
- Sauce and cheese the dishPour the red enchilada sauce evenly over the rolled burritos, letting it pool between them and coat every top surface. Scatter the shredded cheddar-jack over the sauce so it covers the burritos edge to edge. Tap the dish gently on the counter to settle the sauce into any gaps before the pan goes into the oven.Look for Every burrito is fully coated in red sauce, with cheese scattered evenly and no dry tortilla showing through.Tip Leave a small border of sauce visible around the cheese so the edges bubble instead of drying out.
- Bake until bubblingBake the dish in the upper third of a 375°F (190°C) oven for about 18 minutes, rotating the pan once halfway through if the oven heats unevenly. The burritos are ready when the sauce bubbles at the edges and the cheese has melted into a continuous golden blanket over the top. Remove the dish carefully with dry oven mitts.Look for The sauce bubbles steadily around the edges, the cheese is fully melted with light golden patches, and the dish smells toasty and savory.Tip Switch the oven to broil for the final minute if the cheese has melted but not taken on any color.
This phase ends with the dish coming out of the oven, so the checkpoints are visual and audible. The sauce should be bubbling at the edges of the dish, a slow, steady simmer rather than an aggressive boil, and the cheese should have melted into one continuous layer with a few golden spots where it touched the hot sauce.
The tortillas should look plump and coated, no dry corners peeking through. When a knife tip slides into the thickest burrito and the filling touches hot to the lip, the bake is done.
Rest and finish
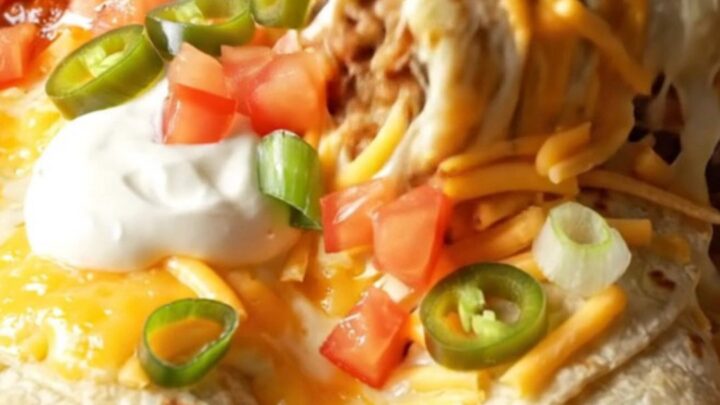
- Rest, top, and serveLet the baking dish rest for 5 minutes so the cheese sets and the sauce thickens slightly, which makes lifting each burrito out clean and whole. Spoon sour cream over the top in dollops, then scatter diced tomatoes, sliced scallions, and sliced jalapeños across the dish. Lift out a burrito with a wide spatula and serve it steaming hot.Look for A spatula slides under each burrito cleanly, and the cheese stretches in long ribbons as the first one is lifted.Tip Add the cold toppings after the rest so they stay cool and contrast the hot, cheesy burritos.
After the five-minute rest, the dish should look settled rather than violently bubbling: the sauce has thickened slightly around the burritos, and the cheese blanket holds its shape when nudged.
A wide spatula should slide under a burrito and lift it out whole, with the cheese stretching in long ribbons as it rises. The cool toppings go on now, after the rest, so the sour cream stays a distinct dollop and the tomatoes, scallions, and jalapeños keep their texture instead of wilting into the heat.
Common mistakes
The most common slip is wet filling. Beef that still releases liquid, beans that were not drained and patted dry, or rice straight from a moist batch will soak the tortillas from the inside, and no amount of baking firms them back up. Cook the beef until the pan is nearly dry and blot the beans.
Cold tortillas are the second trap: they crack when rolled and split in the oven, so warm them until they bend smoothly. Overfilling is third; a burrito stuffed past its seams bursts under the sauce and spills filling into the dish. Finally, do not skimp on sauce coverage.
How to tell it’s done
The dish is done when the enchilada sauce bubbles steadily around the edges of the pan and the cheese has melted into a smooth, continuous blanket with light golden patches on top. Lift one corner of a burrito with a spatula: the tortilla should look tender and coated, not dry or cracked, and the center of the filling should be steaming hot when a knife tip is inserted and touched to the lip.
- Ground meat: 160°F (71°C) in the thickest part
Up next · Part 3 of 3
4 variations · storage & make-ahead · 5 answers · printable card
Tips, FAQ & printable recipe (Part 3)← Back to the ingredients (Part 1)