Dinner · Part 2 of 3: Instructions
Bacon-Wrapped Garlic Parmesan Chicken Step-by-step instructions
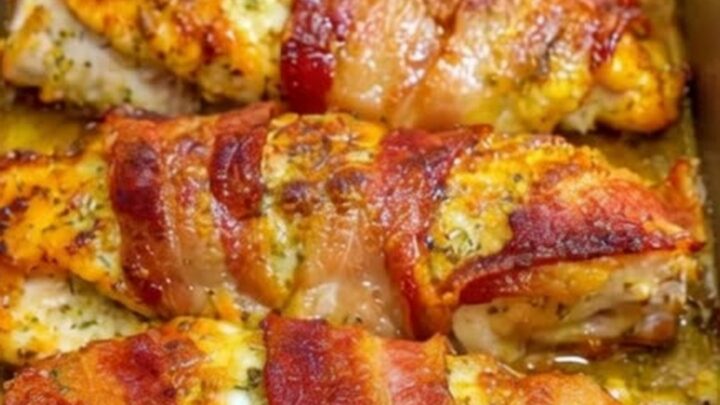
- Prep
- Cook
- Total
- Serves
- 5
Before you start
Before you begin cooking, gather all your ingredients and equipment to ensure a smooth process. Preheating the oven to 400°F (204°C) is essential for getting the bacon cooking immediately. Pat the chicken breasts dry with paper towels, which helps the spices adhere. Measure out your garlic powder, dried Italian seasoning, and grate your fresh parmesan cheese so everything is ready to assemble quickly.
Ingredients at a glance (5)
- 5 boneless, skinless chicken breasts
- 10 slices thick-cut bacon
- 1 tbsp garlic powder
- 1 tbsp dried Italian seasoning
- 1/2 cup grated parmesan cheese
Instructions
Phase 1: Prep and Seasoning
- Seasoning the Chicken BreastsPat the chicken breasts dry with paper towels to ensure the seasonings adhere properly. Season all sides generously with garlic powder and dried Italian herbs.Look for The chicken breasts should be evenly coated with spices.Tip Patting the chicken dry prevents steaming and helps the seasonings stick.
- Wrapping the Chicken with BaconWrap each seasoned chicken breast tightly with two slices of thick-cut bacon, overlapping the slices slightly to cover most of the chicken. Tuck the loose ends of the bacon strips securely underneath the chicken breasts to keep them in place during baking.Look for The bacon should wrap snugly around each breast.Tip Tucking the ends underneath prevents the bacon from unraveling as it shrinks while cooking.
By the end of this phase, the chicken breasts should be thoroughly coated in the fragrant spice mixture and wrapped snugly in the thick-cut bacon. The raw bacon should cover most of the chicken's surface, with the ends neatly tucked underneath to keep them secure.
There should be no loose bacon flaps, and the seasoned chicken should look ready for the baking pan, smelling strongly of garlic and savory herbs.
Phase 2: Cheese and Bake
- Assembling in the PanArrange the bacon-wrapped chicken breasts in a single layer in a metal baking pan. Sprinkle the grated parmesan cheese and any remaining herbs evenly over the top of each wrapped chicken breast, pressing lightly so the cheese adheres to the bacon.Look for The chicken breasts should be arranged with space between them.Tip Leaving space between the breasts allows the hot air to circulate and crisp the bacon evenly.
- Baking the ChickenPlace the baking pan in a preheated oven at 400°F (204°C). Bake for 25 to 30 minutes, watching as the bacon starts to render its fat and turn golden brown, and the parmesan cheese melts into a savory crust.Look for The pan juices should be bubbling and the bacon coloring.Tip A metal baking pan conducts heat better than glass, yielding crispier bacon.
At the end of the baking phase, the kitchen will be filled with the mouthwatering aroma of rendering bacon and melting cheese. The chicken breasts should be sitting in a shallow pool of bubbling savory pan juices.
The bacon will have shrunk slightly, wrapping tightly around the chicken, and will have started to turn a light golden-brown color, while the parmesan cheese on top is completely melted and lightly toasted.
Phase 3: Crisp and Rest
- Crisping the Bacon under the BroilerSwitch the oven to the broil setting on high. Broil the chicken for 2 to 3 minutes, keeping a close eye on the oven, until the bacon becomes crispy and the parmesan cheese turns a deep golden-brown color.Look for The cheese should be bubbling and the bacon deeply browned.Tip Watch closely during broiling as the cheese and bacon can burn very quickly.
- Resting the ChickenRemove the pan from the oven. Insert an instant-read thermometer into the thickest part of the chicken breast to ensure it has reached a safe internal temperature of 165°F (74°C). Let the chicken rest in the seasoned pan juices for 5 minutes before slicing and serving.Look for The chicken should rest and absorb the savory juices.Safe temperature 165°F (74°C) internal temperature (poultry)Tip Resting allows the juices to redistribute throughout the meat, keeping it incredibly tender.
After broiling and resting, the dish reaches its peak visual and sensory appeal. The bacon should be deeply browned and crispy, with sizzling edges. The parmesan cheese should have formed a beautiful, bubbling, golden-brown crust over the top. As the chicken rests in its seasoned pan juices, you will hear a gentle sizzling sound, and the meat will absorb those rich flavors, ensuring a juicy result.
Common mistakes
One common mistake is using chicken breasts that are too cold, which can cause the bacon to cook faster than the chicken. Let the chicken sit at room temperature for no more than 30 minutes before prepping.
Another mistake is using thin-cut bacon, which will burn under the broiler before the chicken reaches its safe internal temperature. Lastly, do not crowd the pan; leave space between the breasts so the hot air can circulate and crisp the bacon.
How to tell it’s done
The only reliable way to determine doneness is by using an instant-read meat thermometer. Insert the probe into the thickest part of the chicken breast, avoiding the bacon.
The chicken is perfectly cooked and safe to eat when the thermometer registers an internal temperature of 165°F (74°C). Avoid overcooking past this point, as the chicken can quickly lose its juiciness, despite the protective bacon wrap.
- Poultry: 165°F (74°C) in the thickest part
Up next · Part 3 of 3
3 variations · storage & make-ahead · 4 answers · printable card
Tips, FAQ & printable recipe (Part 3)← Back to the ingredients (Part 1)